
-
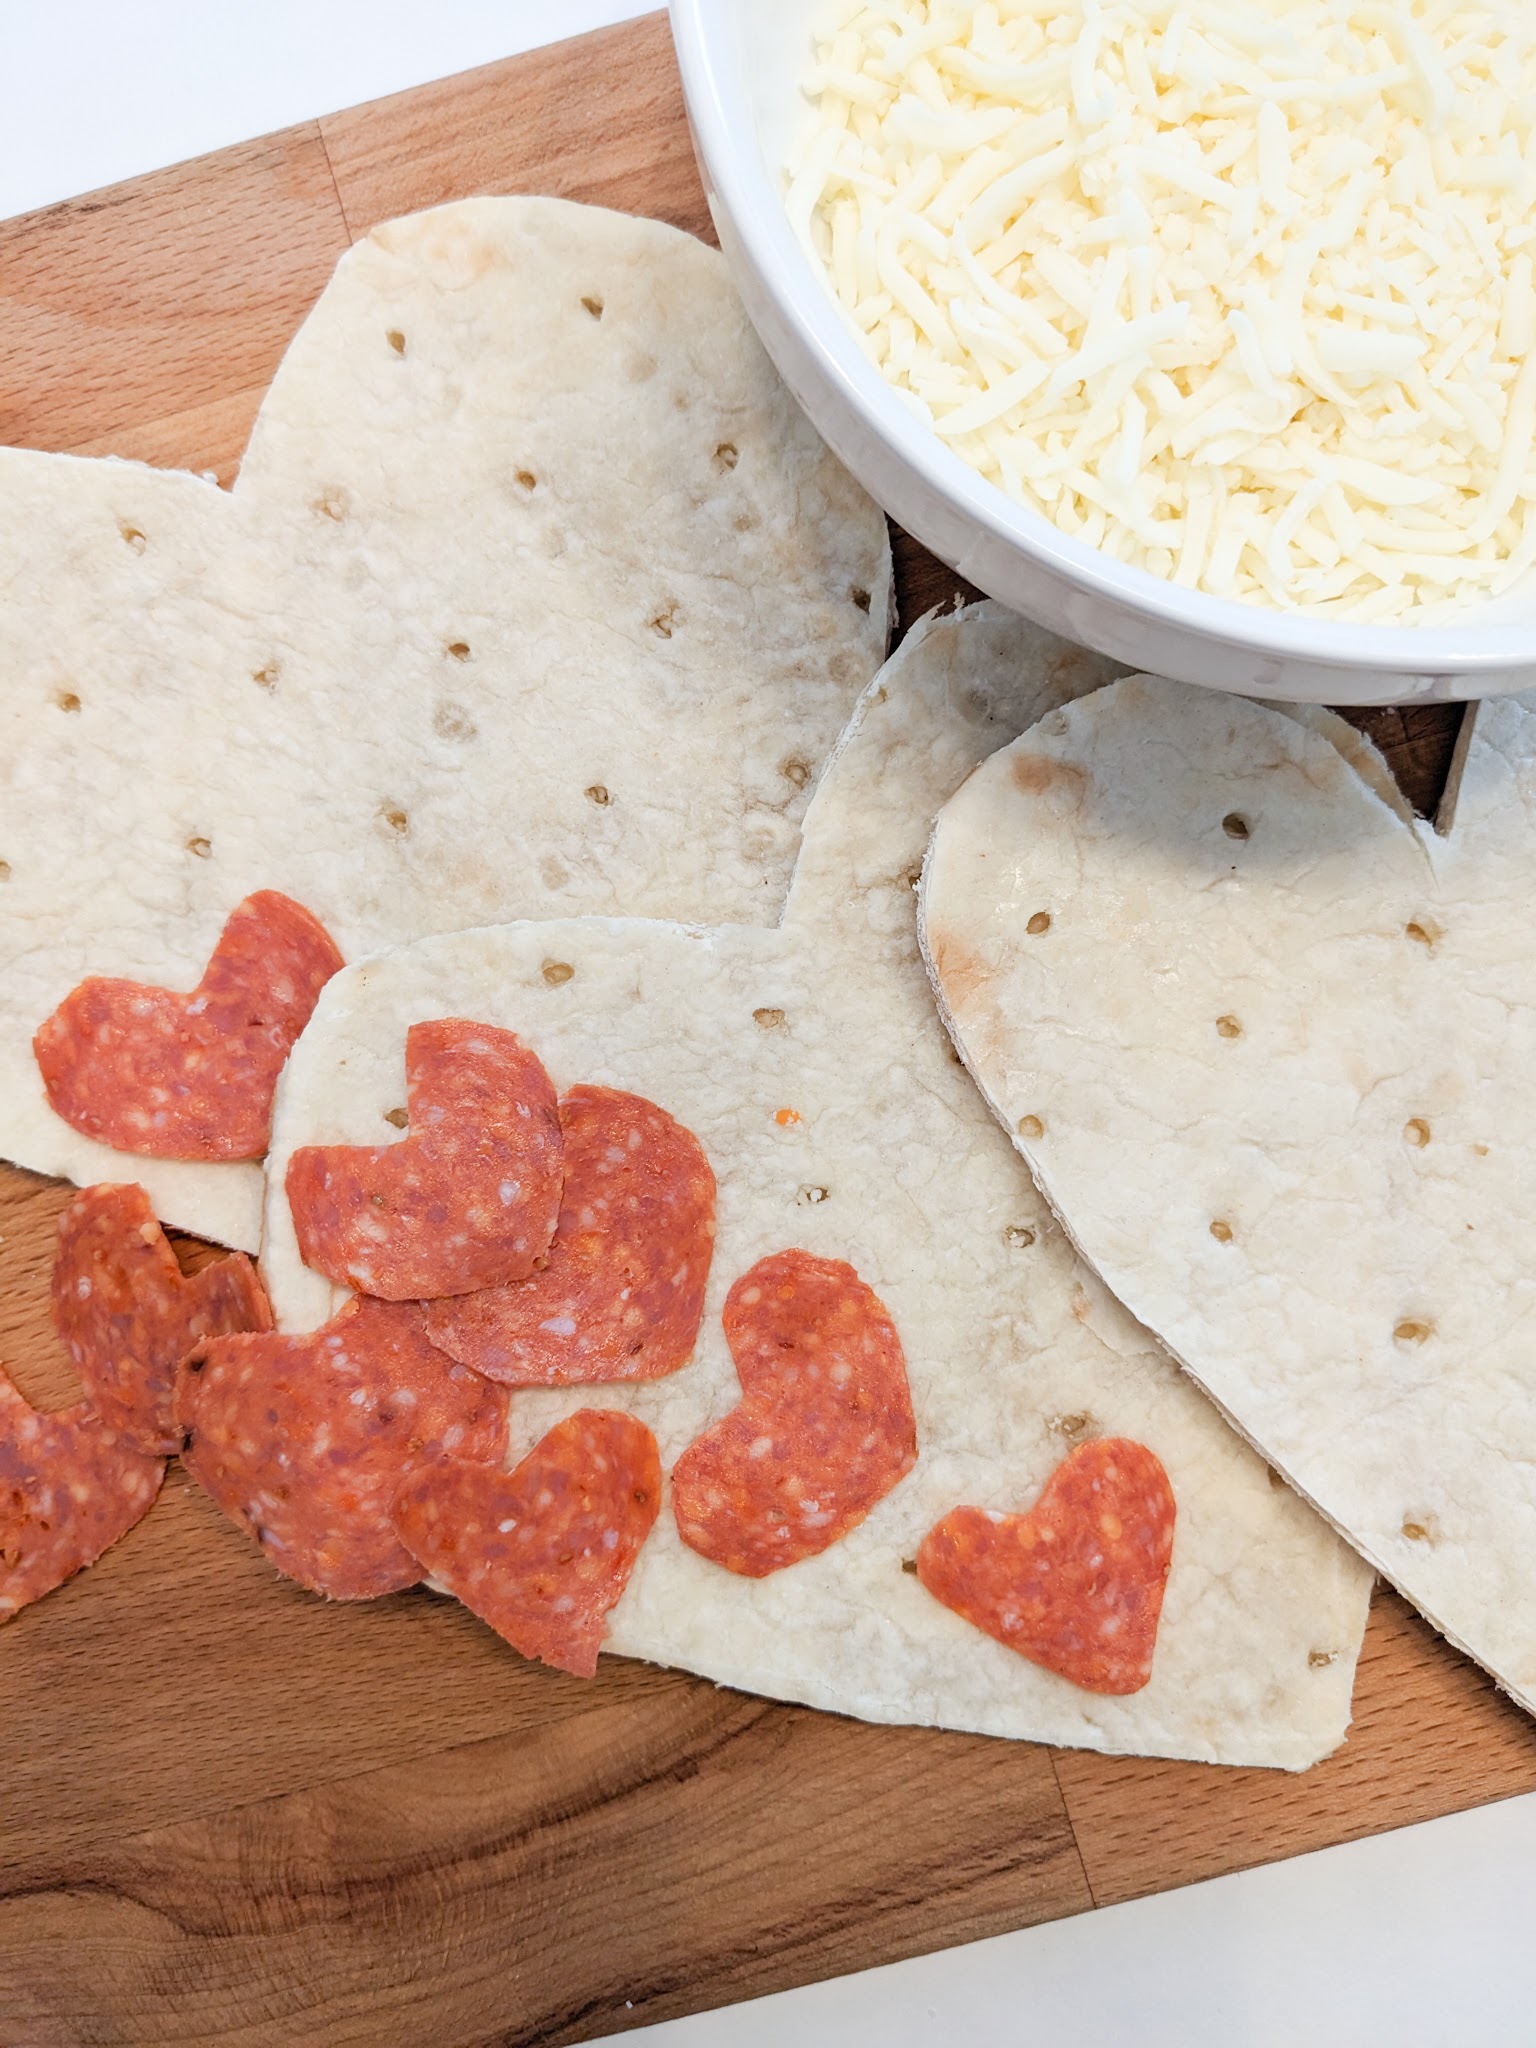
Easy Valentine’s Day Pizzas

Valentine’s Day is my oldest daughter’s favorite holiday. She loves to make Valentine’s cards for all her friends, decorate the house, and everything heart shaped. These Valentine’s Day mini pizzas are a super easy and fun way to celebrate Valentine’s Day. My kids had so much fun helping make the pizzas. Bonus: it wasn’t too messy to clean up and it can feed the whole family!
Ingredients:
- Pre-made mini pizza crusts, thin crust
- Pizza sauce
- Mozzarella cheese
- Pepperoni slices
- Olive oil
Let’s Bake:
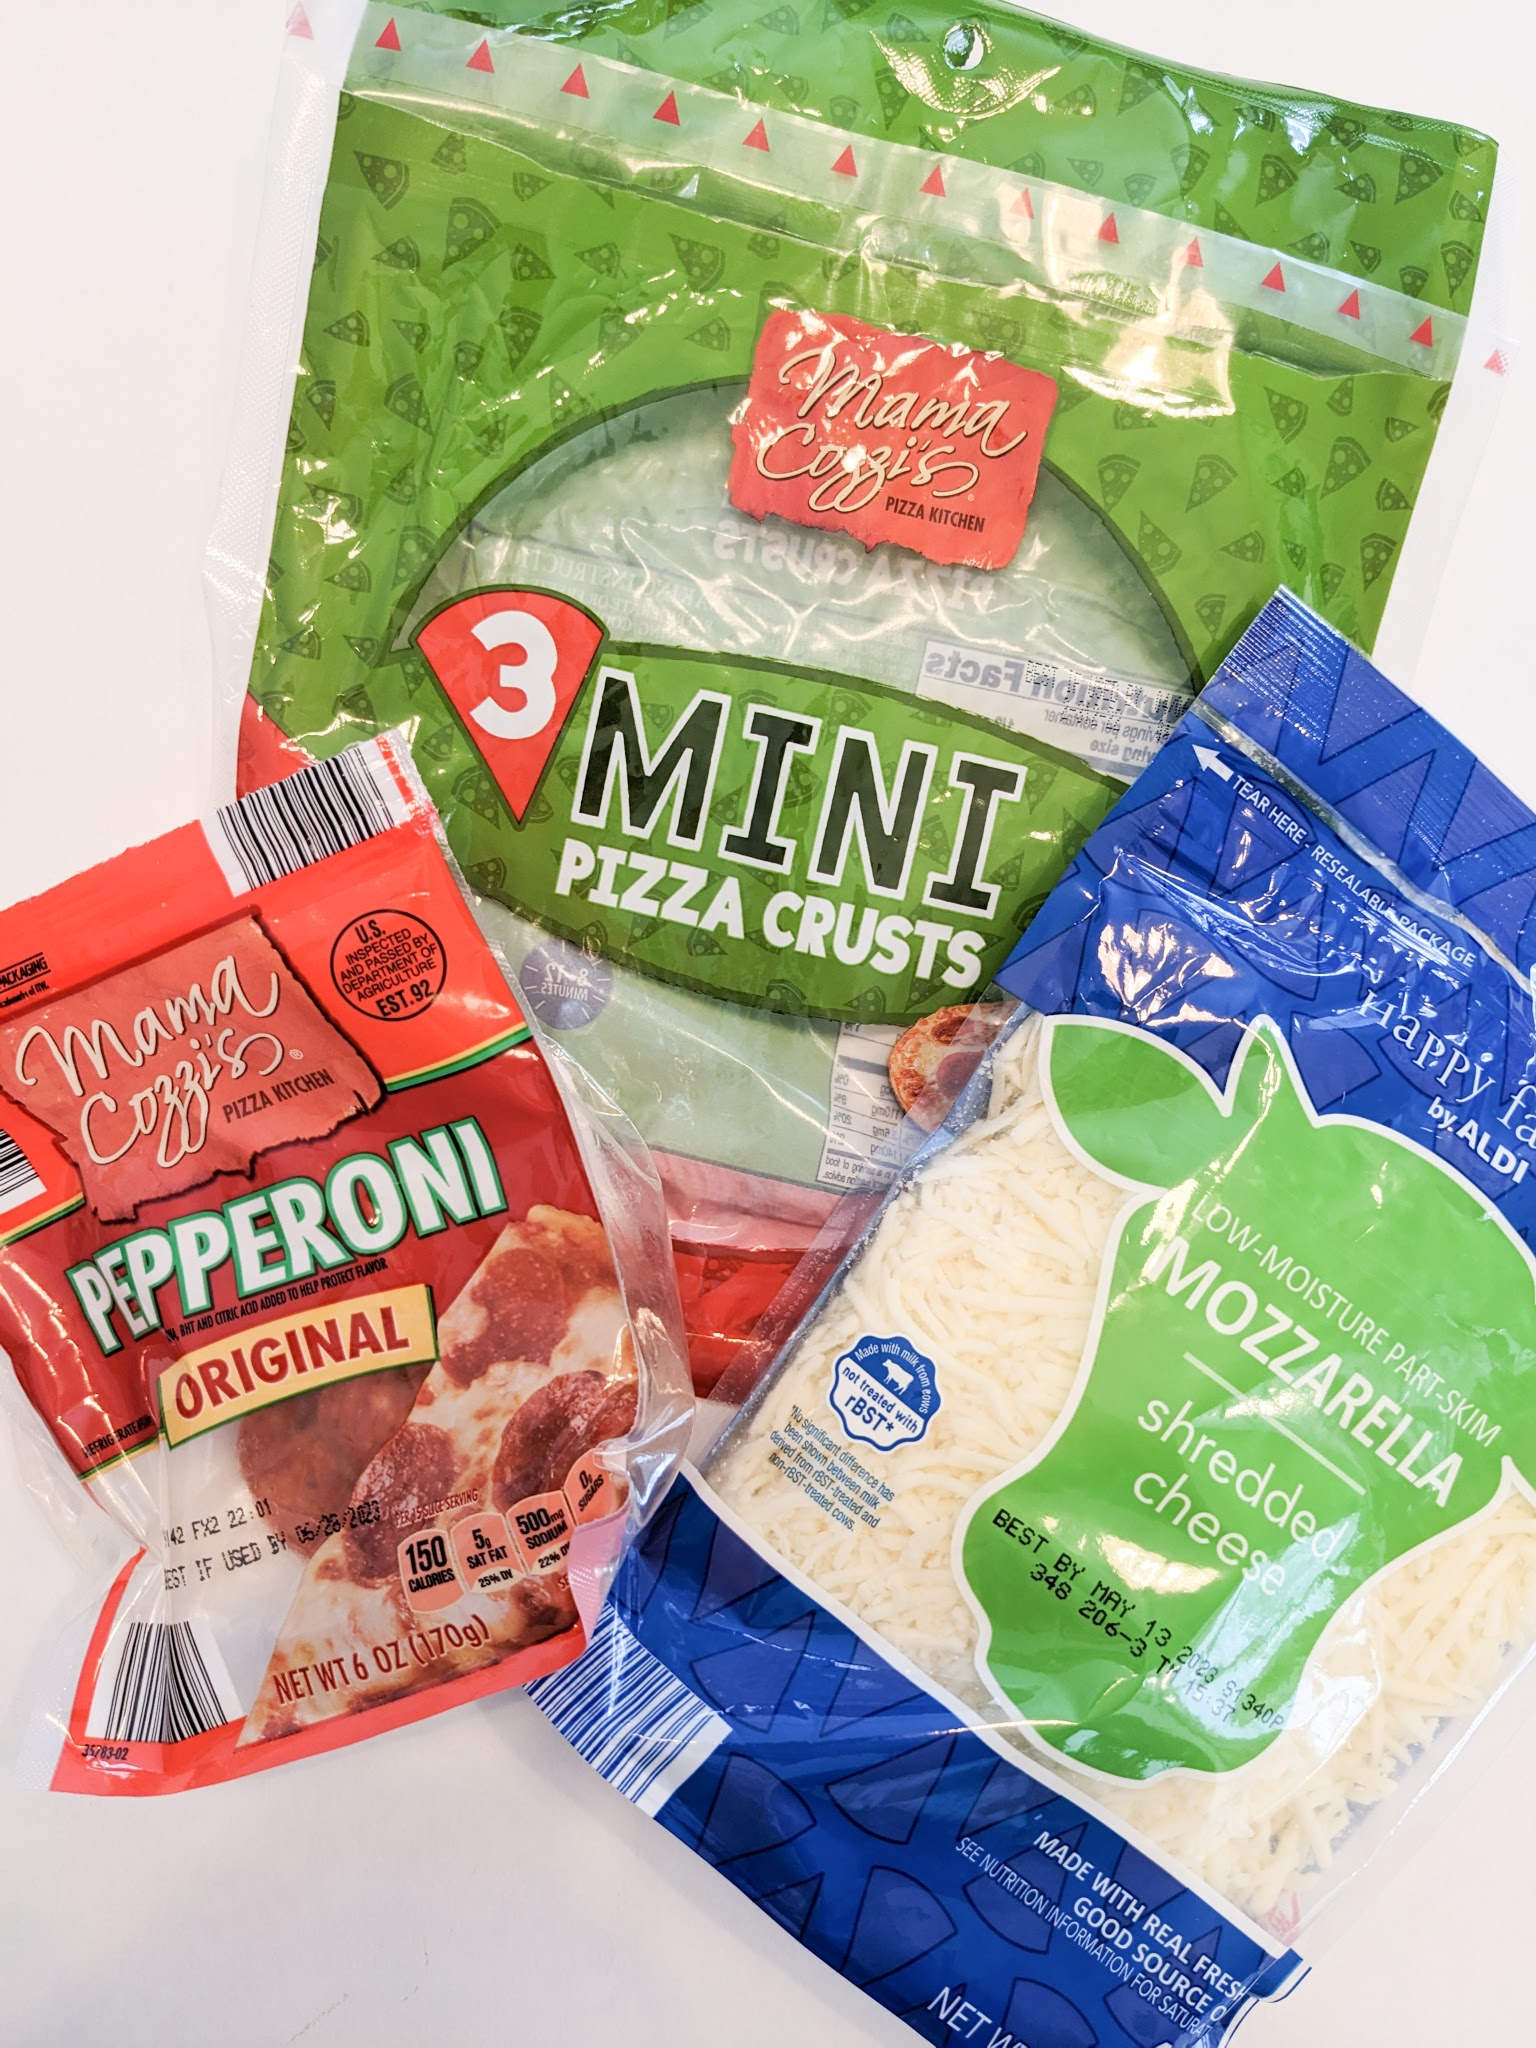
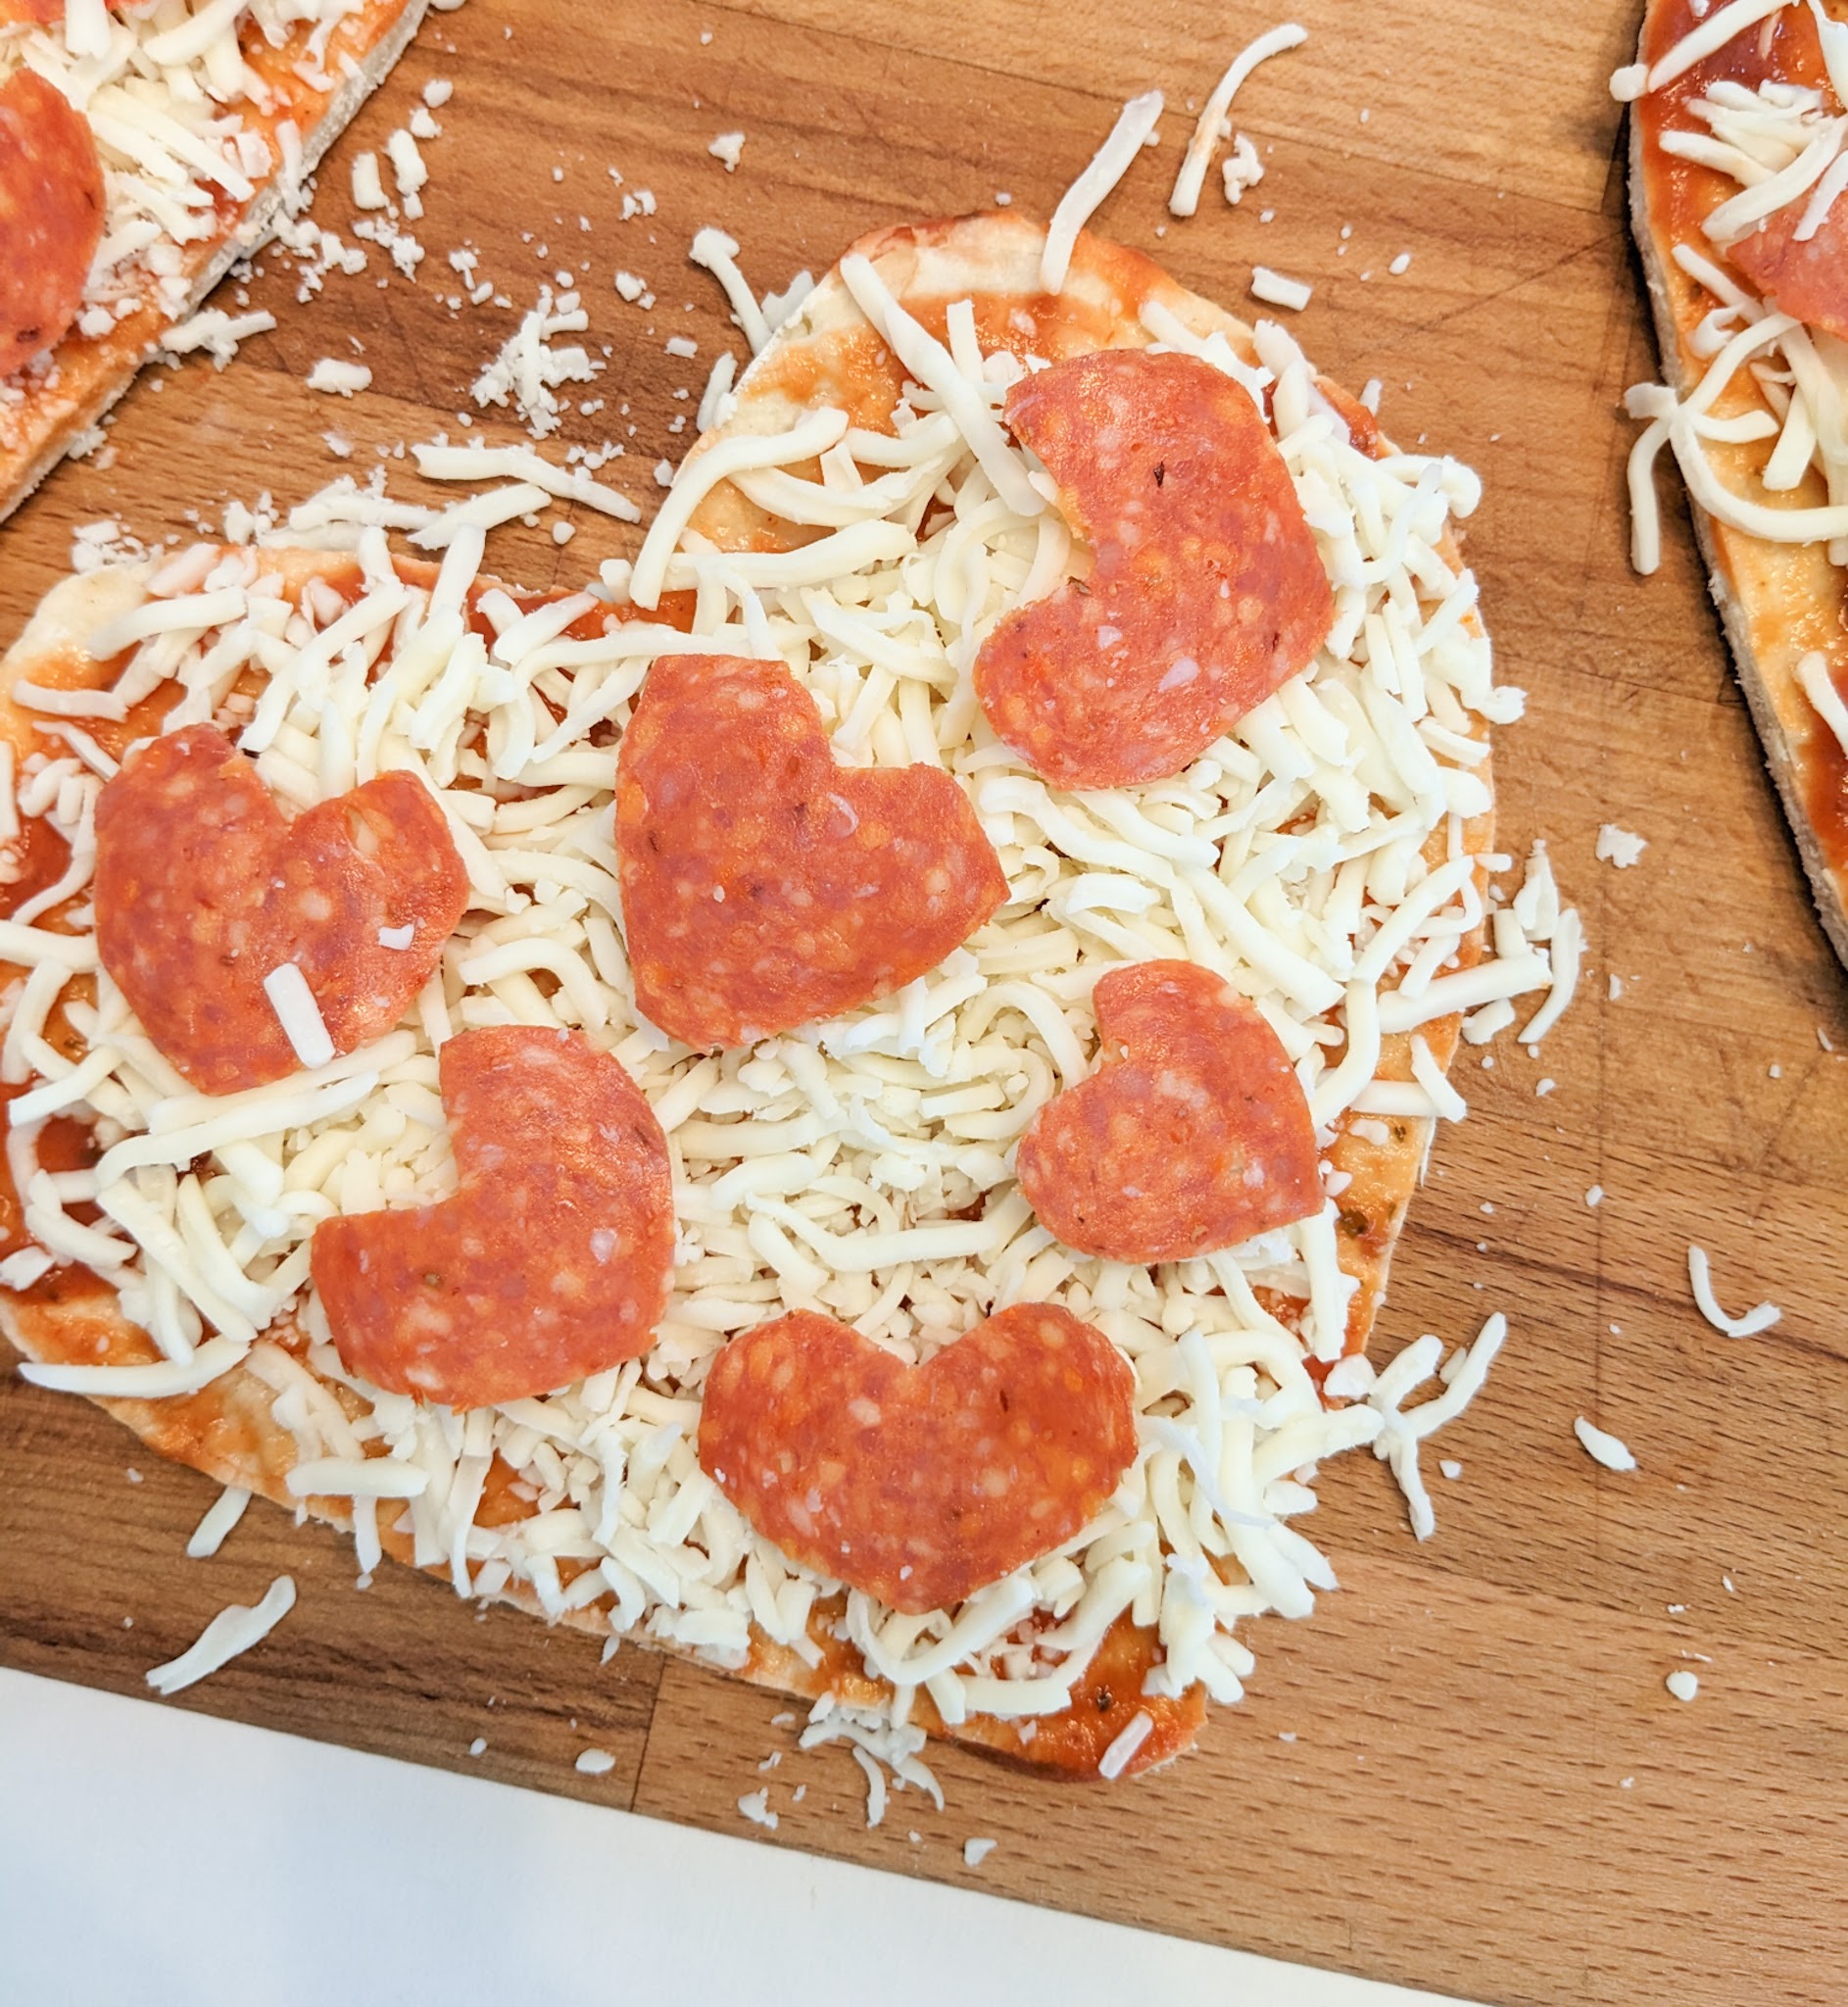
We were able to get all our ingredients at our local Aldi store. We used the Mama Cozzi brand thin crust pizza crusts and pepperoni slices, and the happy farm mozzarella cheese. You can usually find the pizza crusts in the aisle with all the boxed pasta, jarred sauces, canned goods, and baking supplies. To get started, preheat your oven to 450°F. Take your thin crusts pizzas out of the package, and using some kitchen scissors, cut the crusts into heart shapes. Place the crusts on a baking sheet and brush the crusts with some olive oil. Spread some pizza sauce on top of the olive oiled crusts. Next, sprinkle on some mozzarella cheese. You can add as much cheese as you like. Next, take some pepperoni slices and cut the pepperoni into heart shapes as well. Then place the pepperoni slices on top of the mozzarella cheese on the pizzas. Place in the oven for 7-9 minutes until the cheese is a golden brown color. Remove the baking sheet from the oven and allow the pizzas to cool a little before slicing and serving.
This is such a fun, easy, and budget-friendly lunch to make to celebrate Valentine’s Day. It’s also a fun activity to do with your kids! Enjoy ♥

Easy Valentin'e's Day Pizzas

Ingredients:
1 pack of mini pre-made pizza crusts, thin crust
1 jar of pizza sauce
16 oz Mozzarella cheese
6 oz Pepperoni slices
Olive oil
Directions:
- Preheat the oven to 450°F.
- Cut the pizza crusts into heart shapes using kitchen scissors.
- Brush the crust with olive oil and then spread some pizza sauce on each crust.
- Sprinkle each pizza crust with ¼ – ½ cup mozzarella cheese, based on your preference.
- Cut the pepperoni slices into heart shapes using your kitchen scissors, and then place pepperoni slices on top of the mozzarella cheese.
- Place the pizzas on a baking sheet and bake in the oven for 7-9 minutes until the cheese is a golden brown.
- Remove from the oven and allow to cool before serving.
-
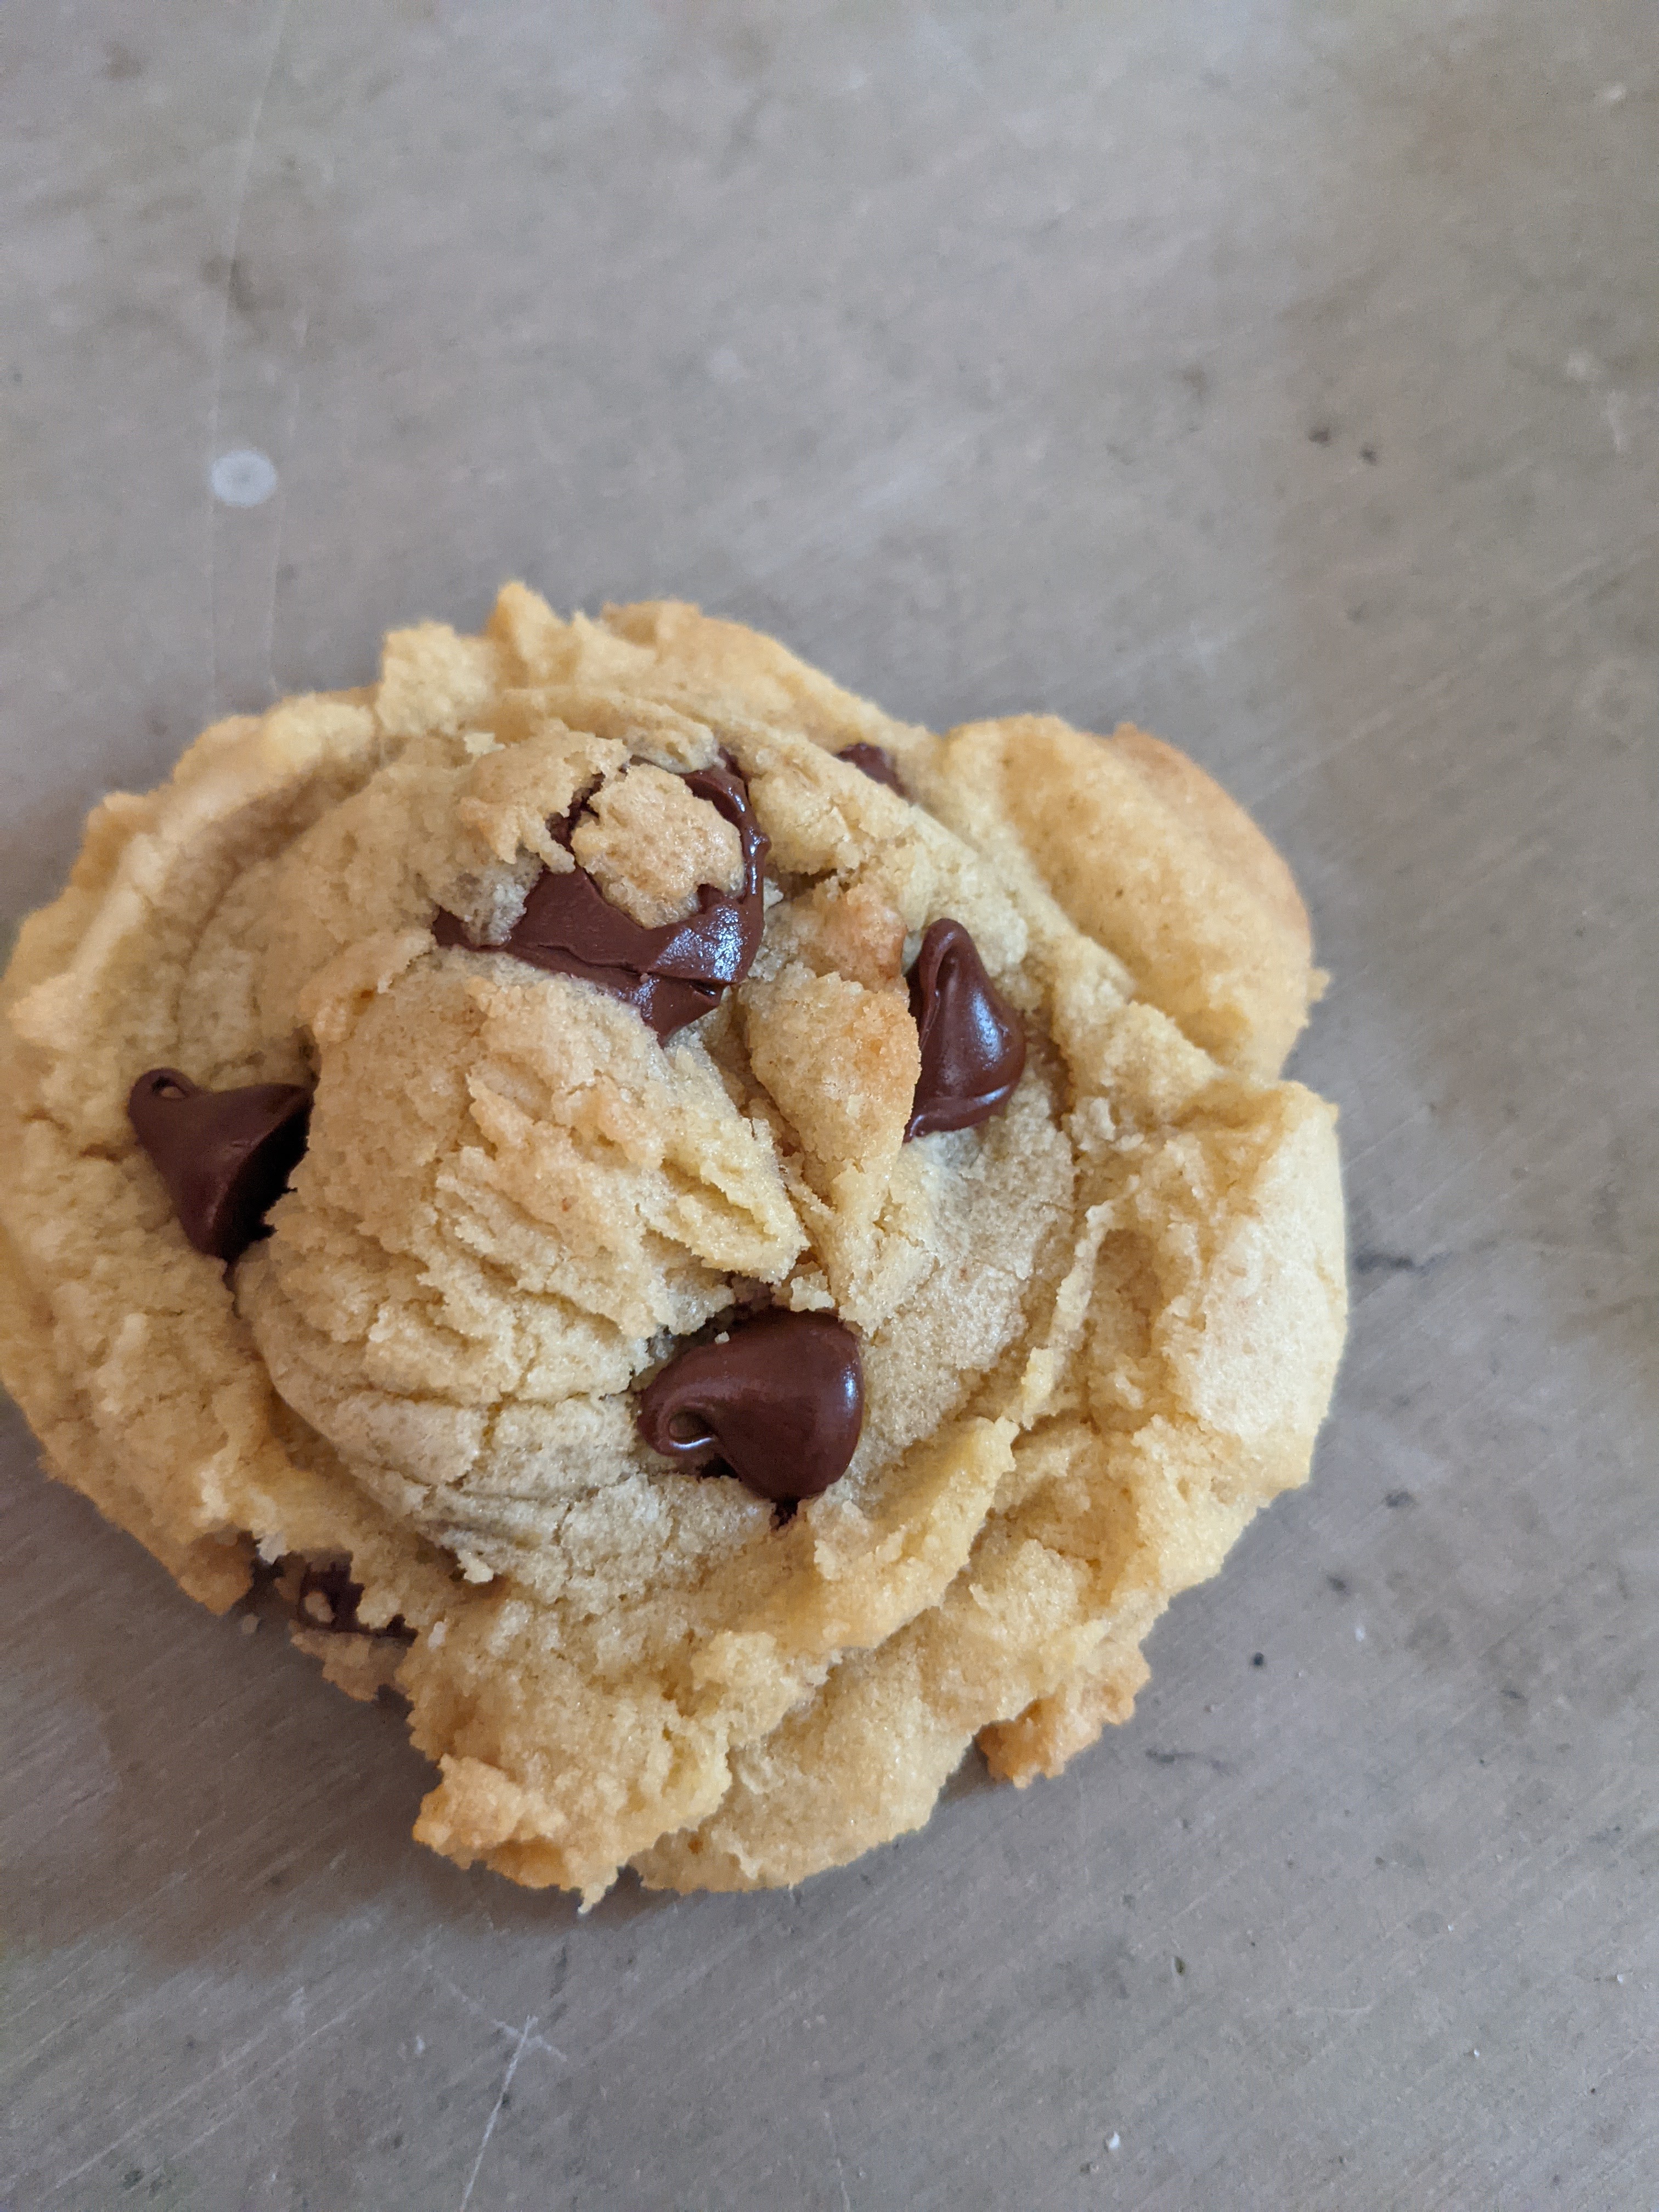
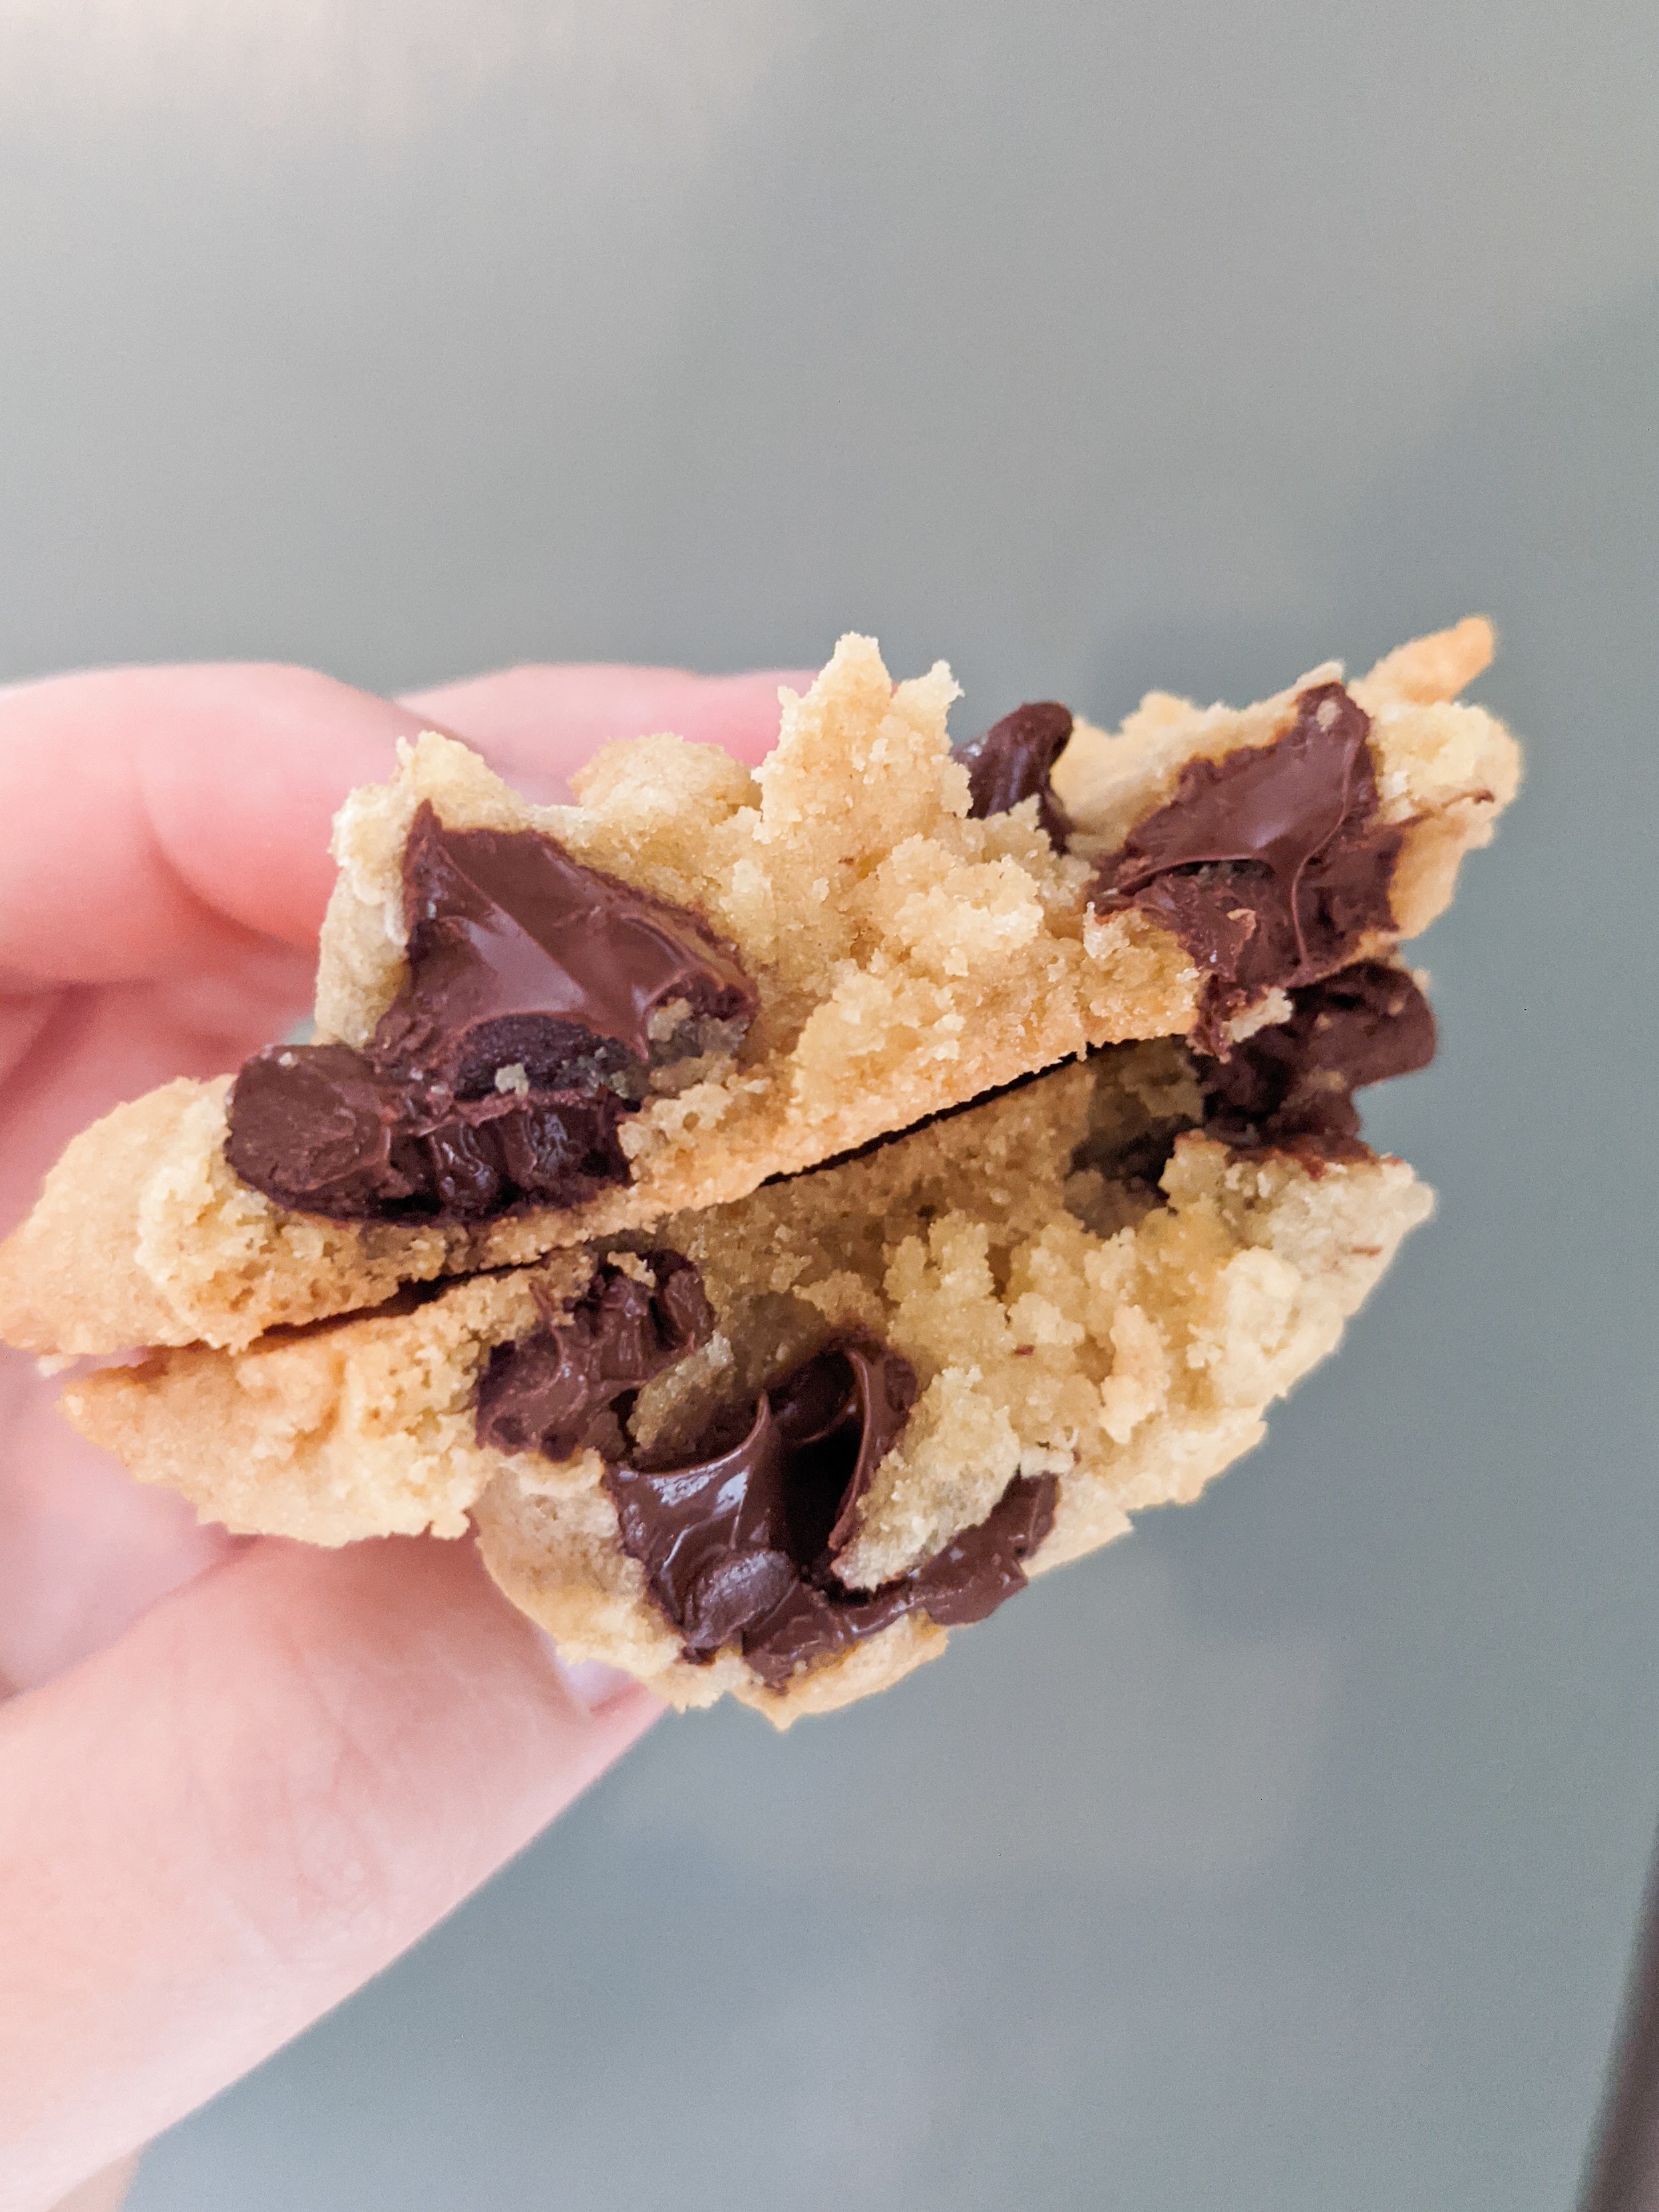
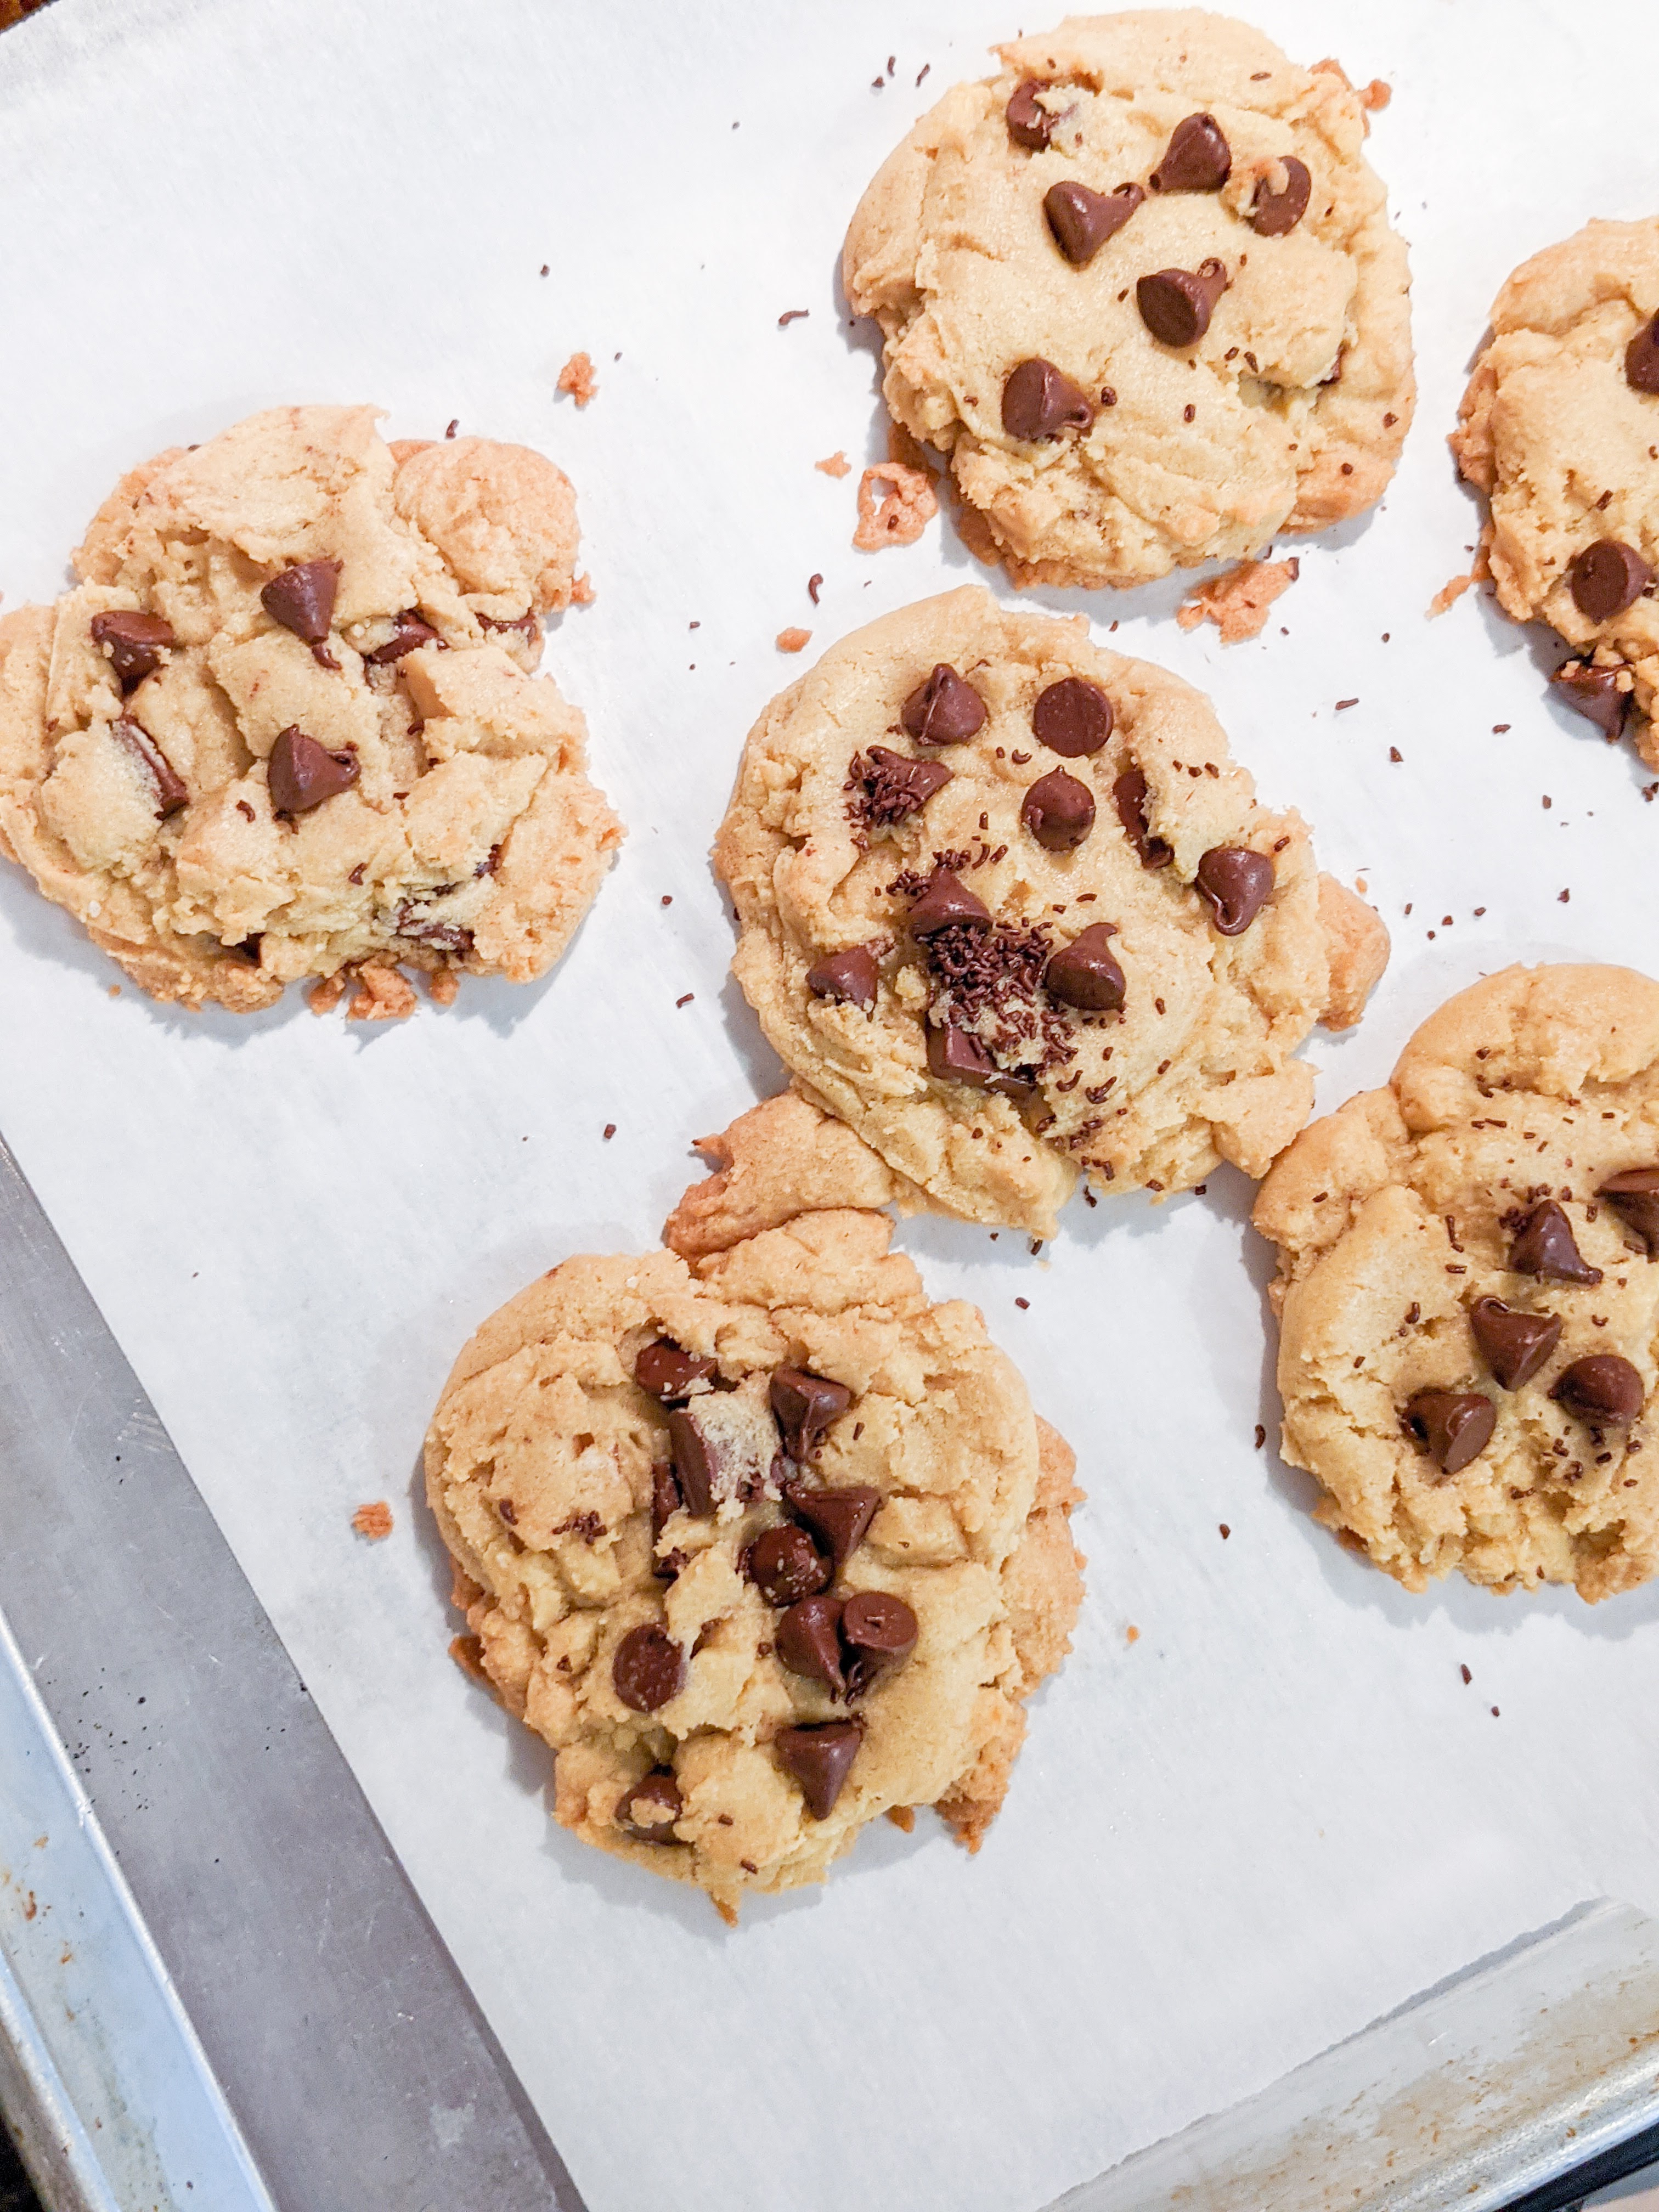
Chocolate Chip Cookies
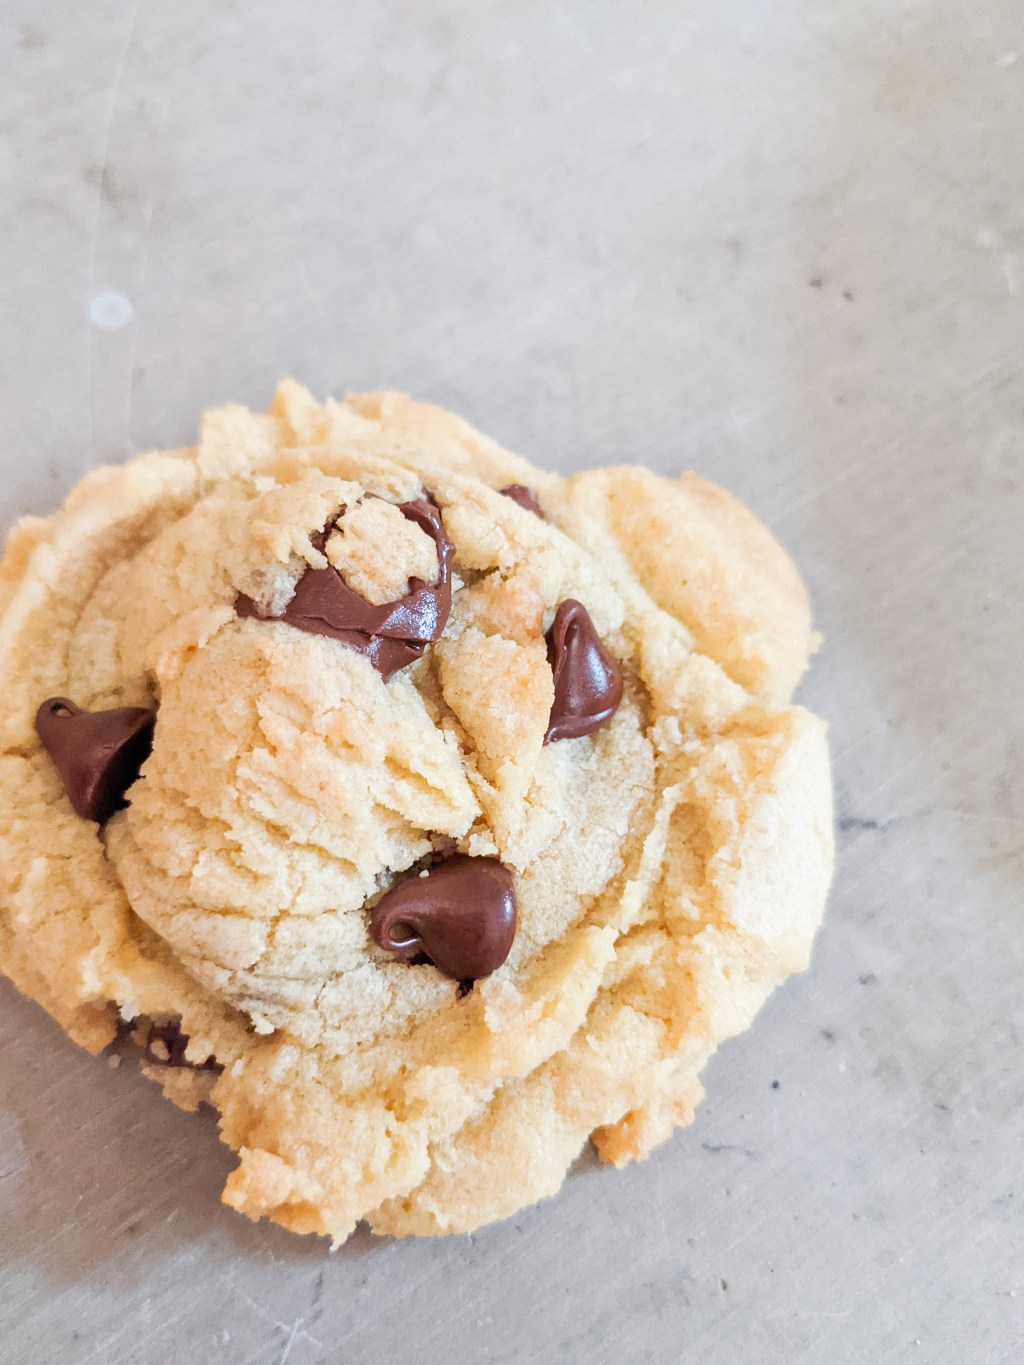
Nothing can beat a classic chocolate chip cookie. Served with a glass of milk or crumbled on top of a scoop of vanilla custard, chocolate chip cookies are my absolute favorite type of cookie. The gooey chocolate chips inside this soft cookie is heaven on earth. This recipe is so easy to make. You can bake up the whole batch or portion the dough out and freeze the pre-scooped dough. Then you have cookie dough for any time you’re craving a little sweet treat.

Ingredients:
- Unsalted butter, melted and cooled
- Brown sugar
- Granulated sugar
- Eggs, room temperature
- Vanilla extract
- All-purpose flour
- Cornstarch
- Baking soda
- Salt
- Semisweet chocolate chips
Let’s Bake:
Melt 1 cup of butter and allow the butter to cool at least 10 minutes. In the bowl of a stand mixer, combine the melted butter and sugars. Add one whole egg and one egg yolk. Next add the vanilla extract and mix on low until combined. In a medium-sized bowl, whisk together the flour, cornstarch, baking soda, and salt. With the mixer on low, slowly add the dry ingredients to the wet ingredients until all the ingredients are combined. Add in the chocolate chips and stir the chocolate chips in with a wooden spoon. Place the dough in the refrigerator to chill for 30 minutes. While the dough is chilling in the fridge, preheat the oven to 350°F and prepare cookie sheets by lining them with parchment paper.
Scoop the dough onto the parchment paper lined cookie sheets, placing the dough at least 2 inches apart. Bake the cookies for 11-12 minutes, or until edges are just browned. They may still seem soft in the middle, but that is ok, because they will continue to cook on the cookie sheets when you take them out of the oven. Gently press a few extra chocolate chips on the top of the cookies as soon as they come out of the oven and sprinkle a little kosher salt on top. Allow the cookies to cool completely on the cookie sheets. If you want to make a slightly larger cookie, you can use 2 scoops of cookie dough to make a larger cookie. Gently flatten the dough of these larger cookies with the bottom of a glass before baking. Bake these larger cookies for 14 minutes. I hope you enjoy ♥
Chocolate Chip Cookies
Ingredients:

1 cups (226g) unsalted butter, melted and
cooled
1 ¼ cup (250g) brown sugar
½ cup (100 g) sugar
1 large egg & 1 egg yolk, room temperature
1 ½ teaspoon vanilla extract
2 ¾ cup (350g) all-purpose flour
2 teaspoons cornstarch
1 teaspoon baking soda
¾ teaspoon salt
1 ¾ cup (300g) semisweet chocolate chips,
plus additional for tops
Directions:
- Melt 1 cup of butter and allow the butter to cool for at least 10 minutes.
- In the bowl of a stand mixer, combine the melted butter and sugars.
- Add egg and egg yolk. Add the vanilla extract and mix on low until combined.
- In a medium-sized bowl, whisk together the flour, cornstarch, baking soda, and salt.
- With the mixer on low, slowly add the dry ingredients to the wet ingredients until all the ingredients are combined.
- Add in the chocolate chips and stir the chocolate chips in with a wooden spoon.
- Place the dough in the refrigerator to chill for 30 minutes.
- Preheat the oven to 350°F and prepare cookie sheets by lining them with parchment paper.
- Scoop the dough onto the parchment paper lined cookie sheets, placing the dough at least 2 inches apart.
- Bake for 11-12 minutes, or until edges are just browned. They may still seem soft in the middle, but that is ok, because they will continue to cook on the cookie sheets when you take them out of the oven.
- Gently press a few extra chocolate chips on the top of the cookies as soon as they come out of the oven and sprinkle a little kosher salt on top.
- Allow the cookies to cool completely on the cookie sheets.
Notes.
- If you want to make a slightly larger cookie, you can use 2 scoops of cookie dough to make a larger cookie. Gently flatten the dough of these larger cookies with the bottom of a glass before baking. Bake these larger cookies for 14 minutes.
- If you don’t want to bake the whole batch of cookies, you can pre-portion the dough and freeze your cookie dough balls. I recommend portioning out the dough onto a baking sheet lined with parchment paper. Allow the dough to freeze before placing the dough into a freezer safe bag. Bake these frozen cookies straight from the freezer at 325°F for 13-15 minutes, or until edges are slightly browned.
-
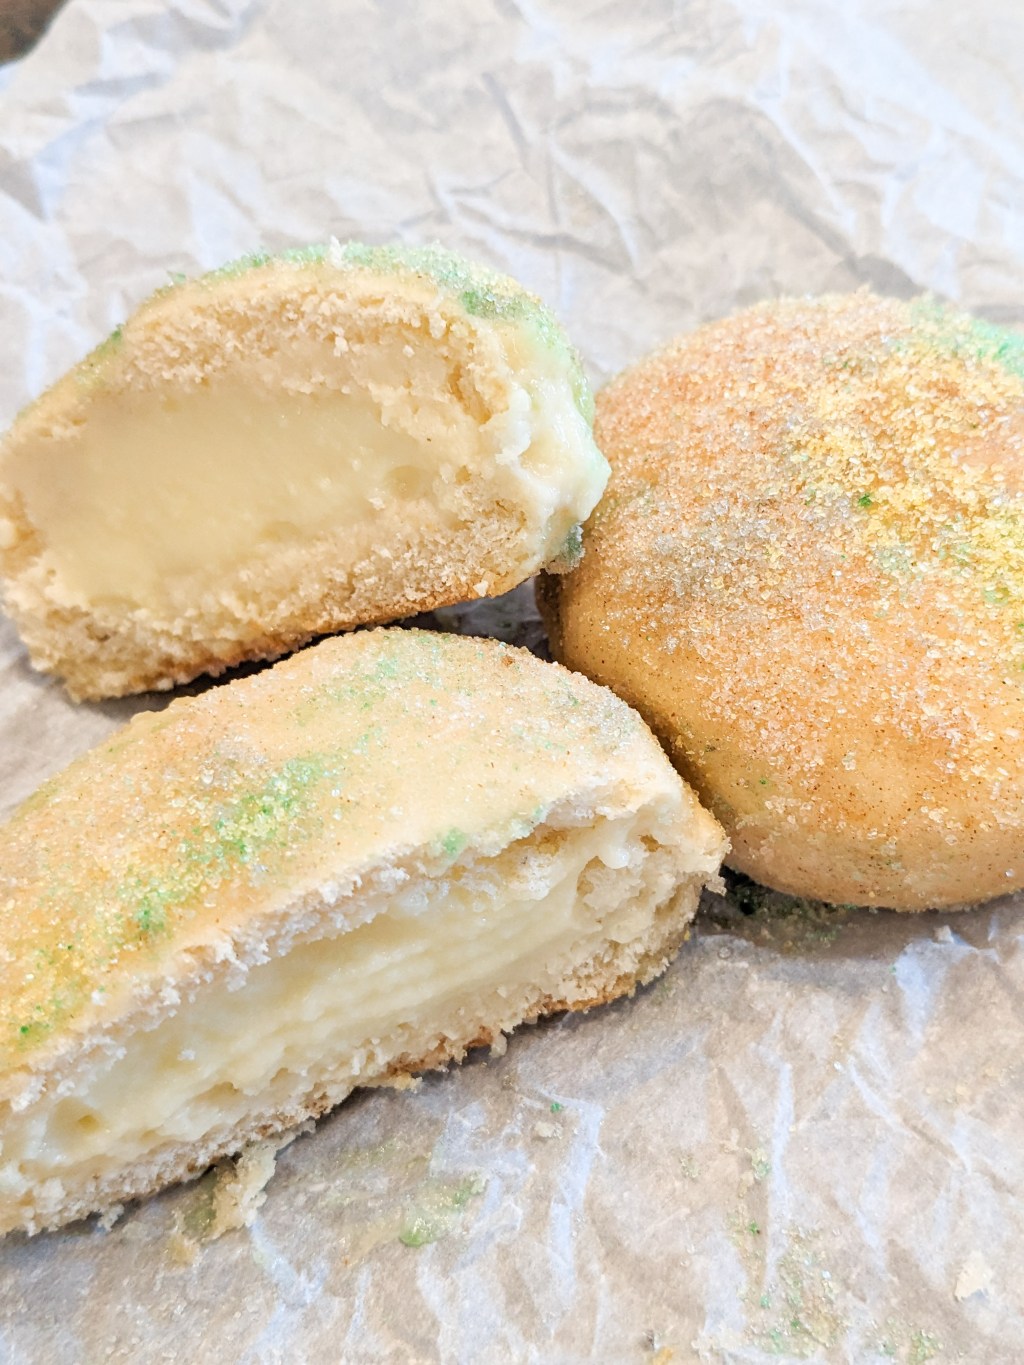
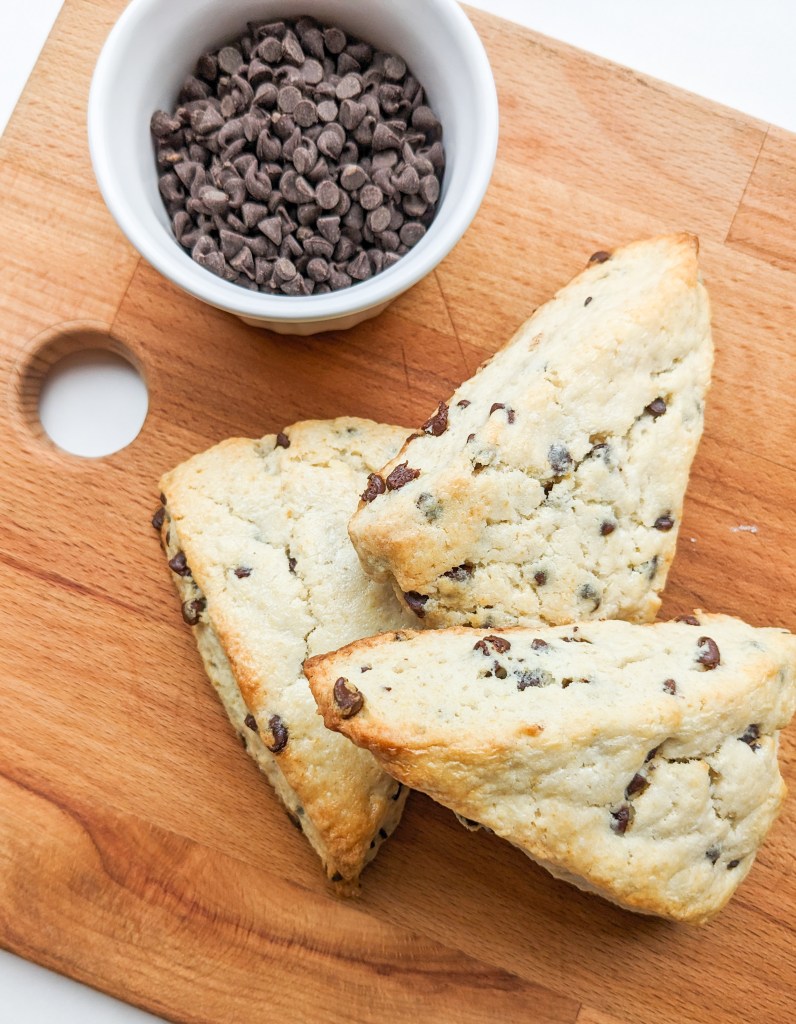
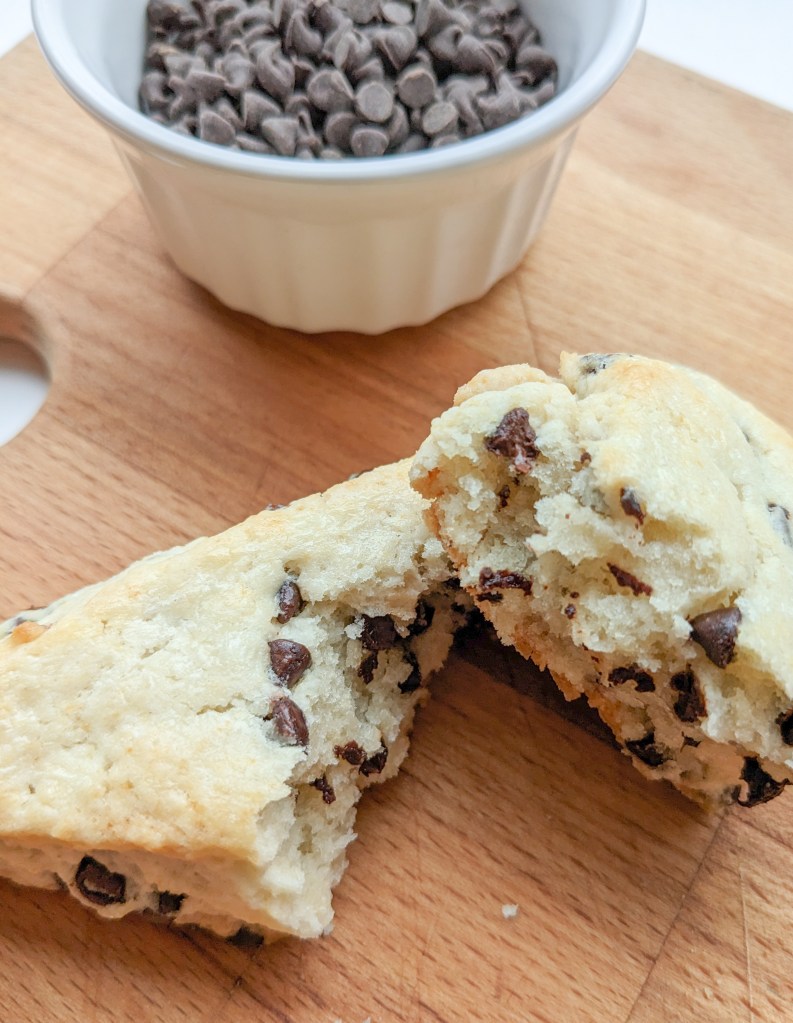
Chocolate Chip Mascarpone Scones

It has been very cold and gloomy here in Wisconsin. During the cold and gloomy weather, all I want to do is curl up on the couch with a hot cup of coffee or tea, a warm fuzzy blanket, and a good book. These scones are the perfect addition. They are delicious! They are nice and crunchy on the outside, but perfectly moist and soft on the inside. The chocolate chips add a perfect amount of sweetness to satisfy any sweet tooth. They are so easy and quick to put together. I used to be intimidated by scones, but they are very easy to make, and with no rise time like bread, they come together super quick. The perfect addition to your morning coffee on a slow, lazy morning or make them ahead of time for an easy breakfast to grab as you run out the door on your way to work.
Ingredients:
- All-purpose flour
- Sugar
- Baking powder
- Salt
- Vanilla extract
- Almond extract, it is ok to leave this ingredient out if you don’t have it on hand
- Butter
- Heavy whipping cream
- Mascarpone cheese
- Mini chocolate chips
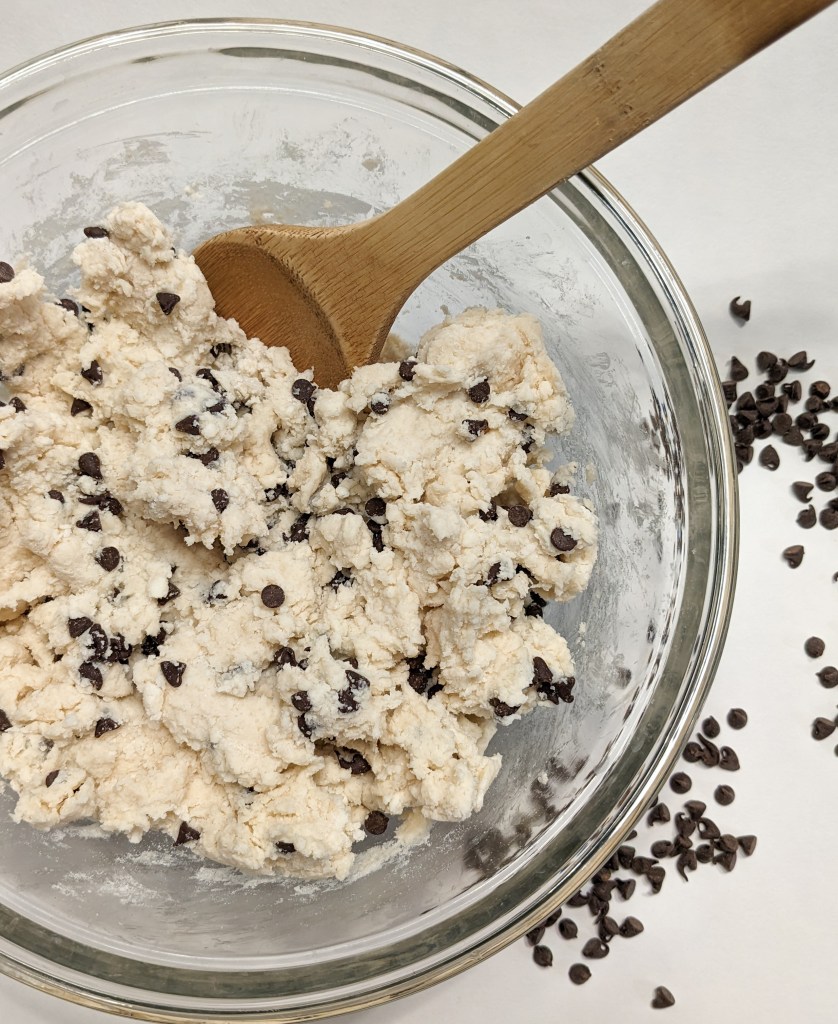
These ingredients come together super quick. All you need is a food processer and a mixing bowl. Add all the dry ingredients to your food processor and pulse them together a few times to mix. Then add the cold butter to the dry ingredients and pulse a few times to cut the butter into the flour mixture. The food processor works nice to quickly do this. If you don’t have a food processor, you can always use a fork or pastry blender to cut the butter into the dry mixture. It is ready when the mixture is nice and crumbly.
In a separate mixing bowl, you will need to mix together the heavy whipping cream and mascarpone cheese. It is easiest to do this if both the cream and cheese are at room temperature. After those are mixed well together, add in your vanilla and almond extracts and stir until combined. Add the flour mixture to your wet mixture and stir until a dough forms. Lastly add the chocolate chips and stir until all the chocolate chips are mixed into the dough.
Prepare your working surface by lightly dusting it with some flour. Turn your dough onto your working surface and gently form the dough into a ball and then press it flat into a circle, about 1 inch tall and 6-7 inches round. Then cut the circle into 8 even wedges. On a baking sheet prepared with parchment paper, place the wedges at least one inch apart. Brush the tops of the scones with remaining heavy whipping cream. This helps the scones develop a nice golden brown color. Now it’s time to bake! Place the scones in a preheated oven at 425 degrees fahrenheit, for 18-20 minutes.
When the scones are done baking, take them out of the oven and let them cool on the baking sheet before transferring to a wire rack to continue cooling. These scones are delicious served either warm or cold. You can store them in an air-tight container for 2-3 days. I hope you enjoy this recipe!
Chocolate Chip Mascarpone Scones
Ingredients:
2 cups (250g) all-purpose flour
⅓ cup (67g) granulated sugar
2 teaspoons baking powder
½ teaspoon salt
1 teaspoon vanilla extract
¼-½ teaspoon almond extract (ok to omit)
5 tablespoons cold butter cut into cubes
½ cup heavy whipping cream at room
temp, plus additional 2-3 tablespoons
½ cup mascarpone cheese at room temp
½ cup semi-sweet mini chocolate chips
Directions:
- Preheat oven to 425℉. Prepare your baking sheet with a sheet of parchment paper.
- In the bowl of your food processor, add the flour, sugar, baking powder and salt. Pulse a few times to mix the dry ingredients together.
- Add the cubed butter to the dry ingredient mixture in the food processor and pulse until the butter is combined with the dry mixture and the mixture is crumbly.
- In a separate bowl, stir together the ½ cup mascarpone cheese with ½ cup heavy whipping cream. Stir well until combined.
- Add the vanilla extract and almond extract to the wet ingredients and stir well.
- Add the flour mixture to the wet mixture and stir together until it forms a dough.
- Add ½ cup of mini chocolate chips and stir until combined in the dough.
- Flour your surface lightly and turn the dough onto your floured surface. Form the dough into a circle. It should be about an inch high and 6-7 inches round.
- Cut the dough into 8 wedges and place the wedges at least one inch apart on your prepared baking sheet.
- Brush the tops of your scones with the remaining 2-3 tablespoons of heavy whipping cream.
- Bake at 425℉ for 18-20 minutes or until the top and edges are slightly brown.
- Allow the scones to cool for a few minutes, and then transfer to a wire cooling rack to continue cooling. These scones are delicious served both warm or cold.
-
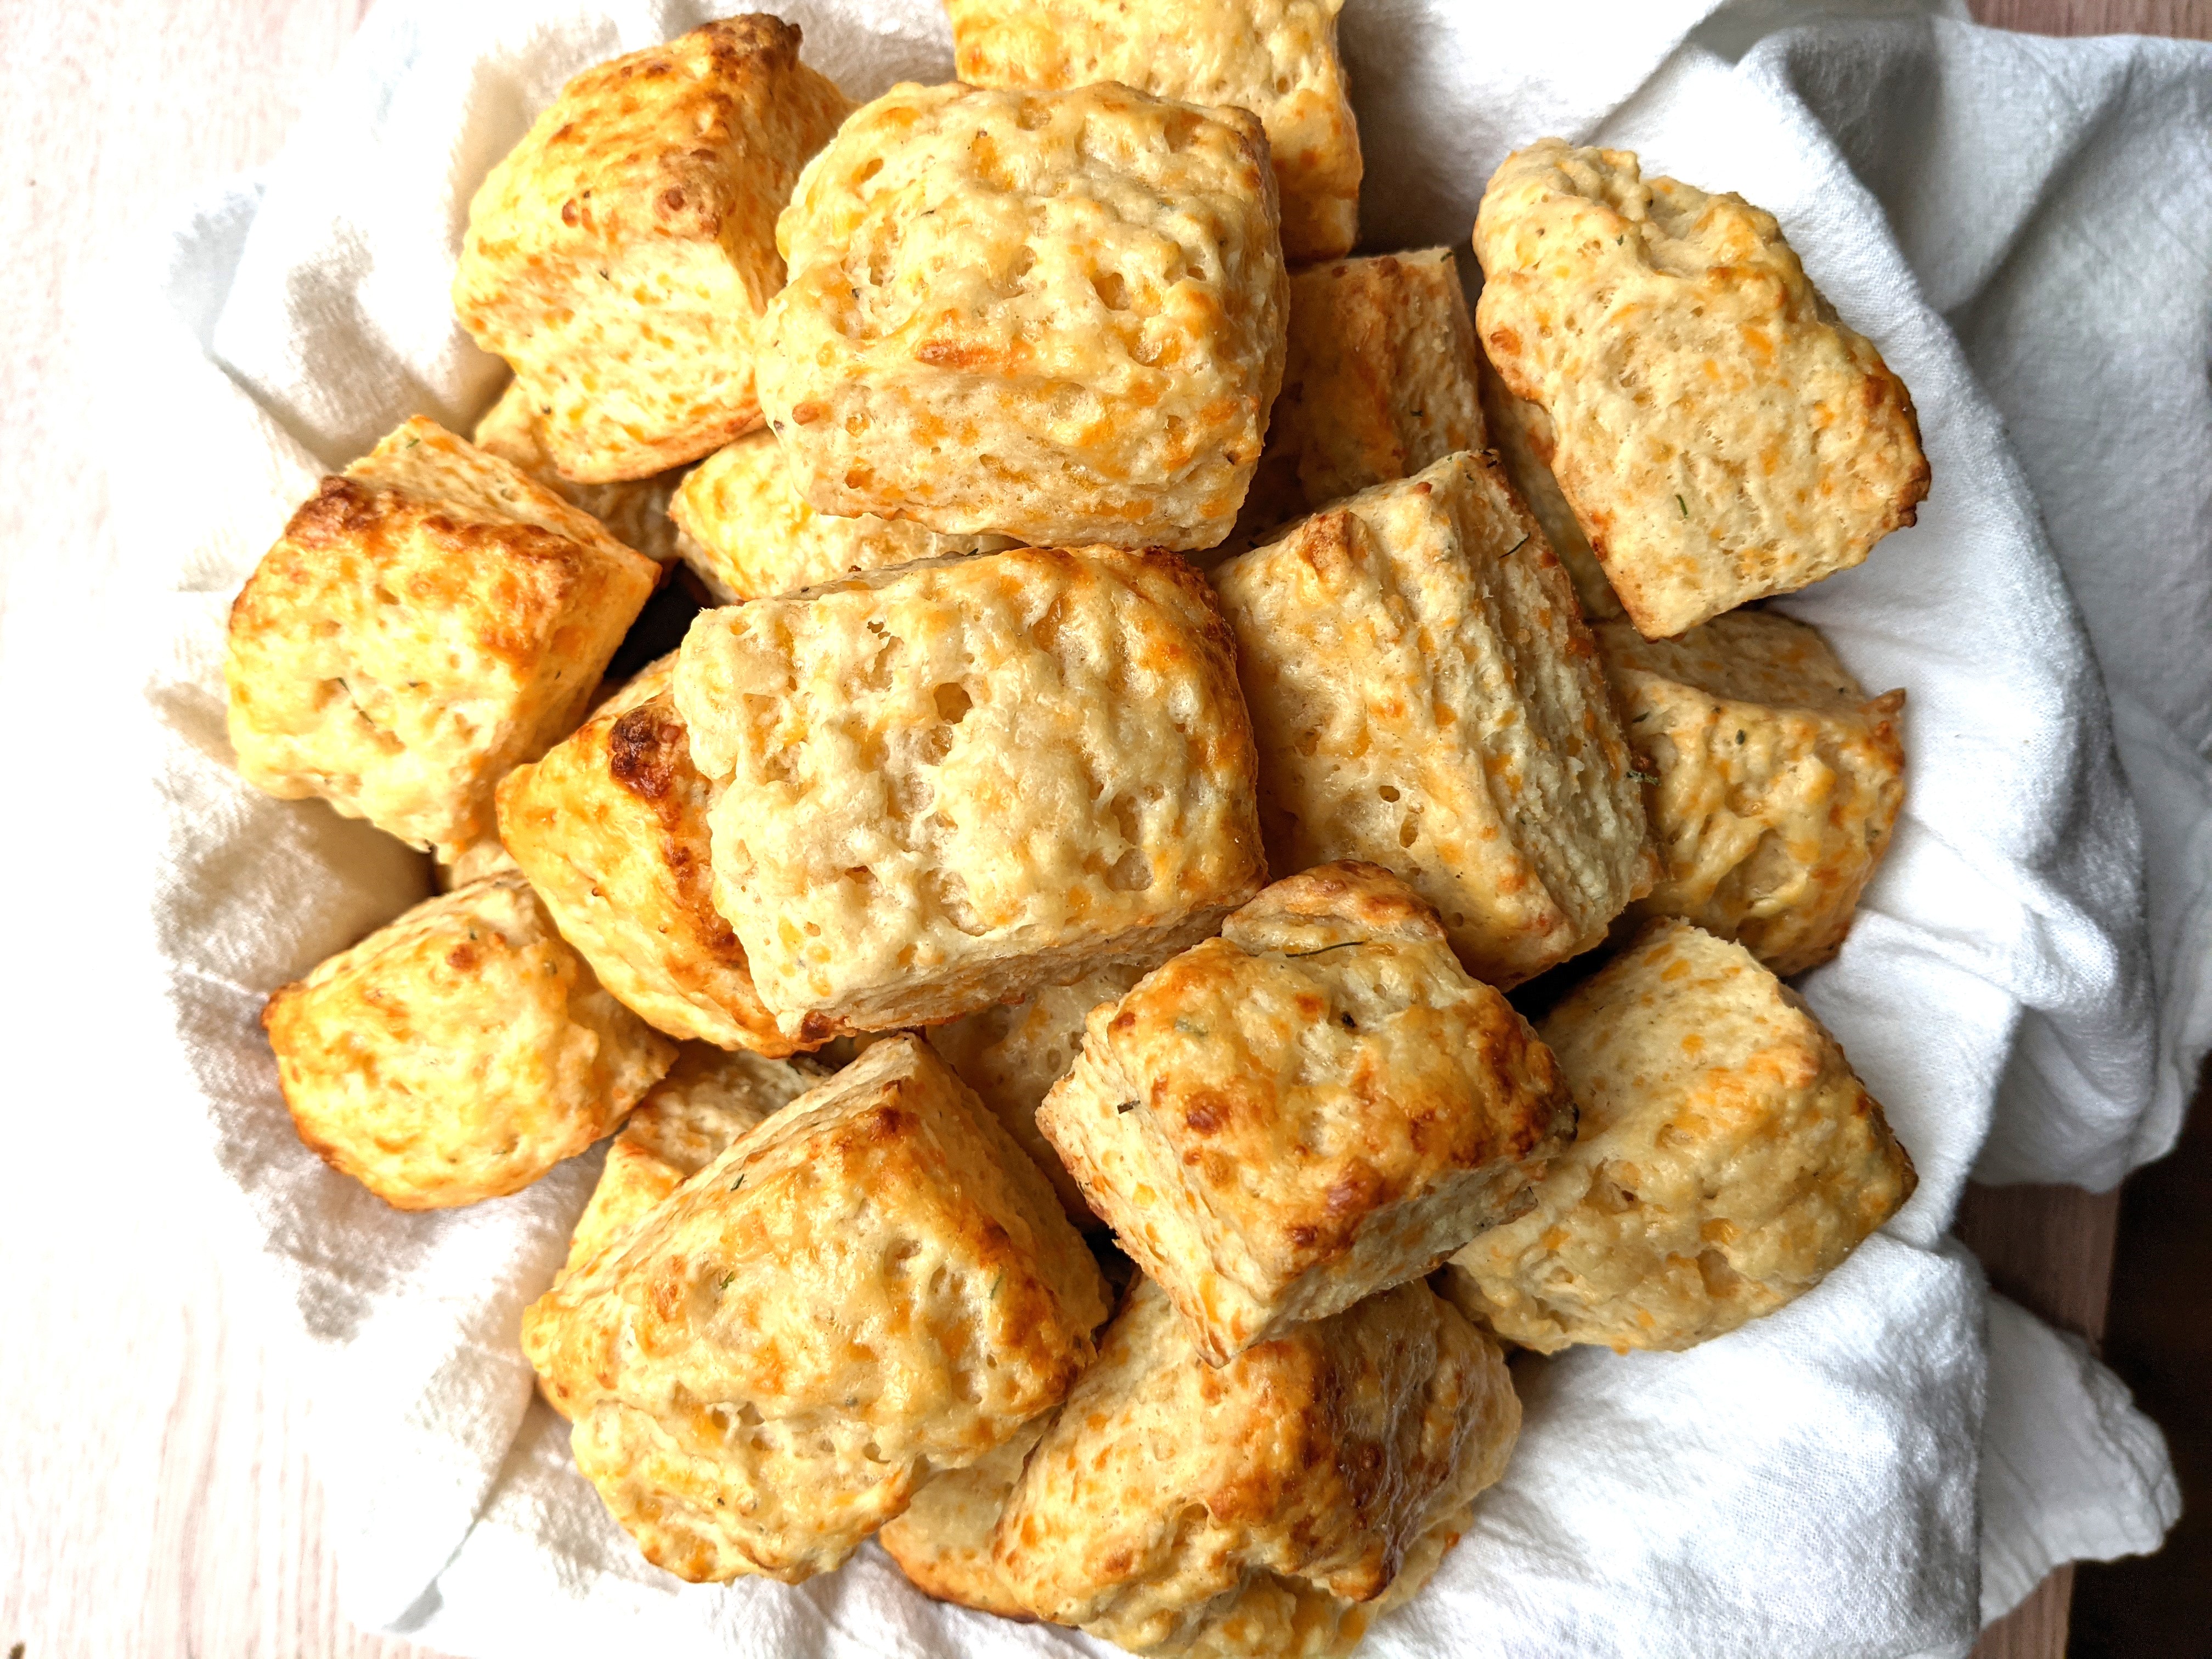
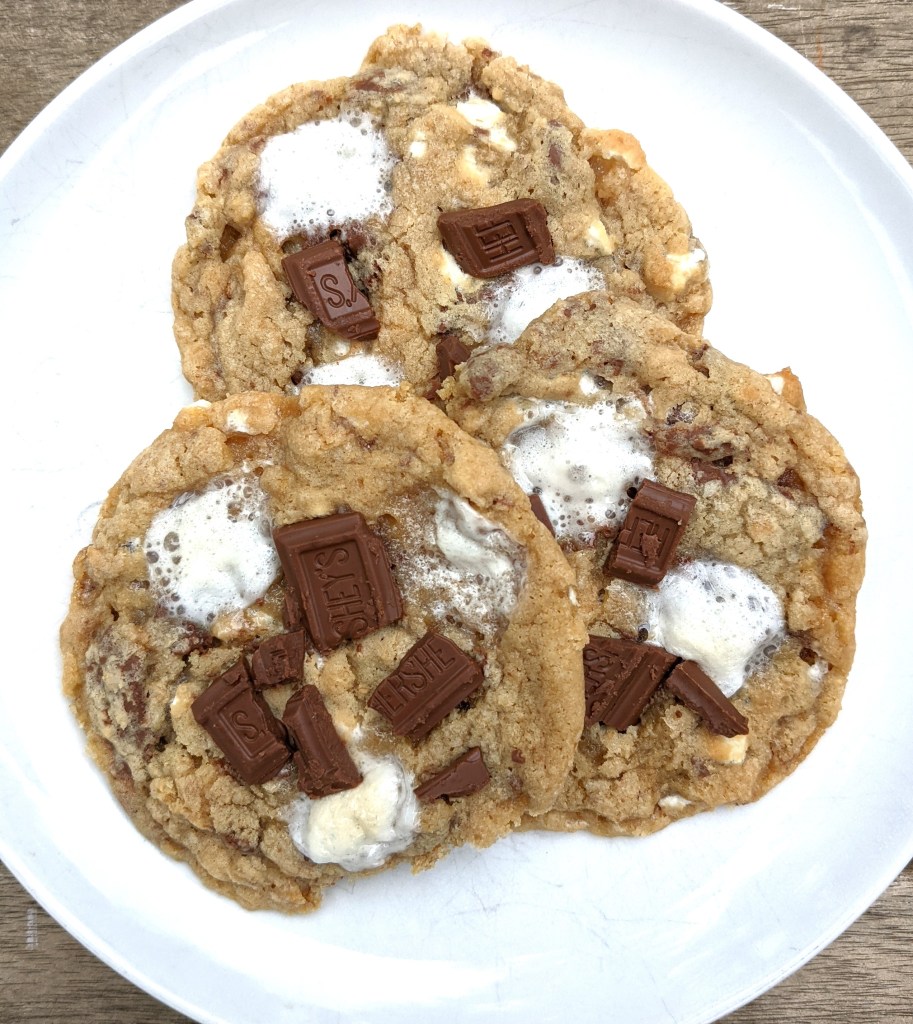
S’mores Cookies

Welcome to my Bakes By Bohrer Website and my first blog post. For my first post, I decided to publish my infamous S’mores cookies recipe. This is my most requested recipe and all my friends and family LOVE these cookies. They are a crowd pleaser and a great addition to any potluck or event.
My family loves to go camping and these cookies were inspired by the classic camping treat, S’mores. This recipe combines gooey marshmallows with crunchy graham crackers and melted chocolate. These cookies are sure to satisfy any sweet tooth and are perfect to make year round. Especially during the long days of winter, to help us look forward to fun summer days ahead.
Ingredients:
– Butter
– Brown sugar
– Eggs
– Vanilla extract
– Graham crackers
– Baking soda
– Salt
– Flour
– Chocolate bars, I use the classic milk chocolate Hershey’s bars
– Dehydrated marshmallow bits. I found these at my local grocery store. They can also be bought on Amazon.com
– Mini marshmallows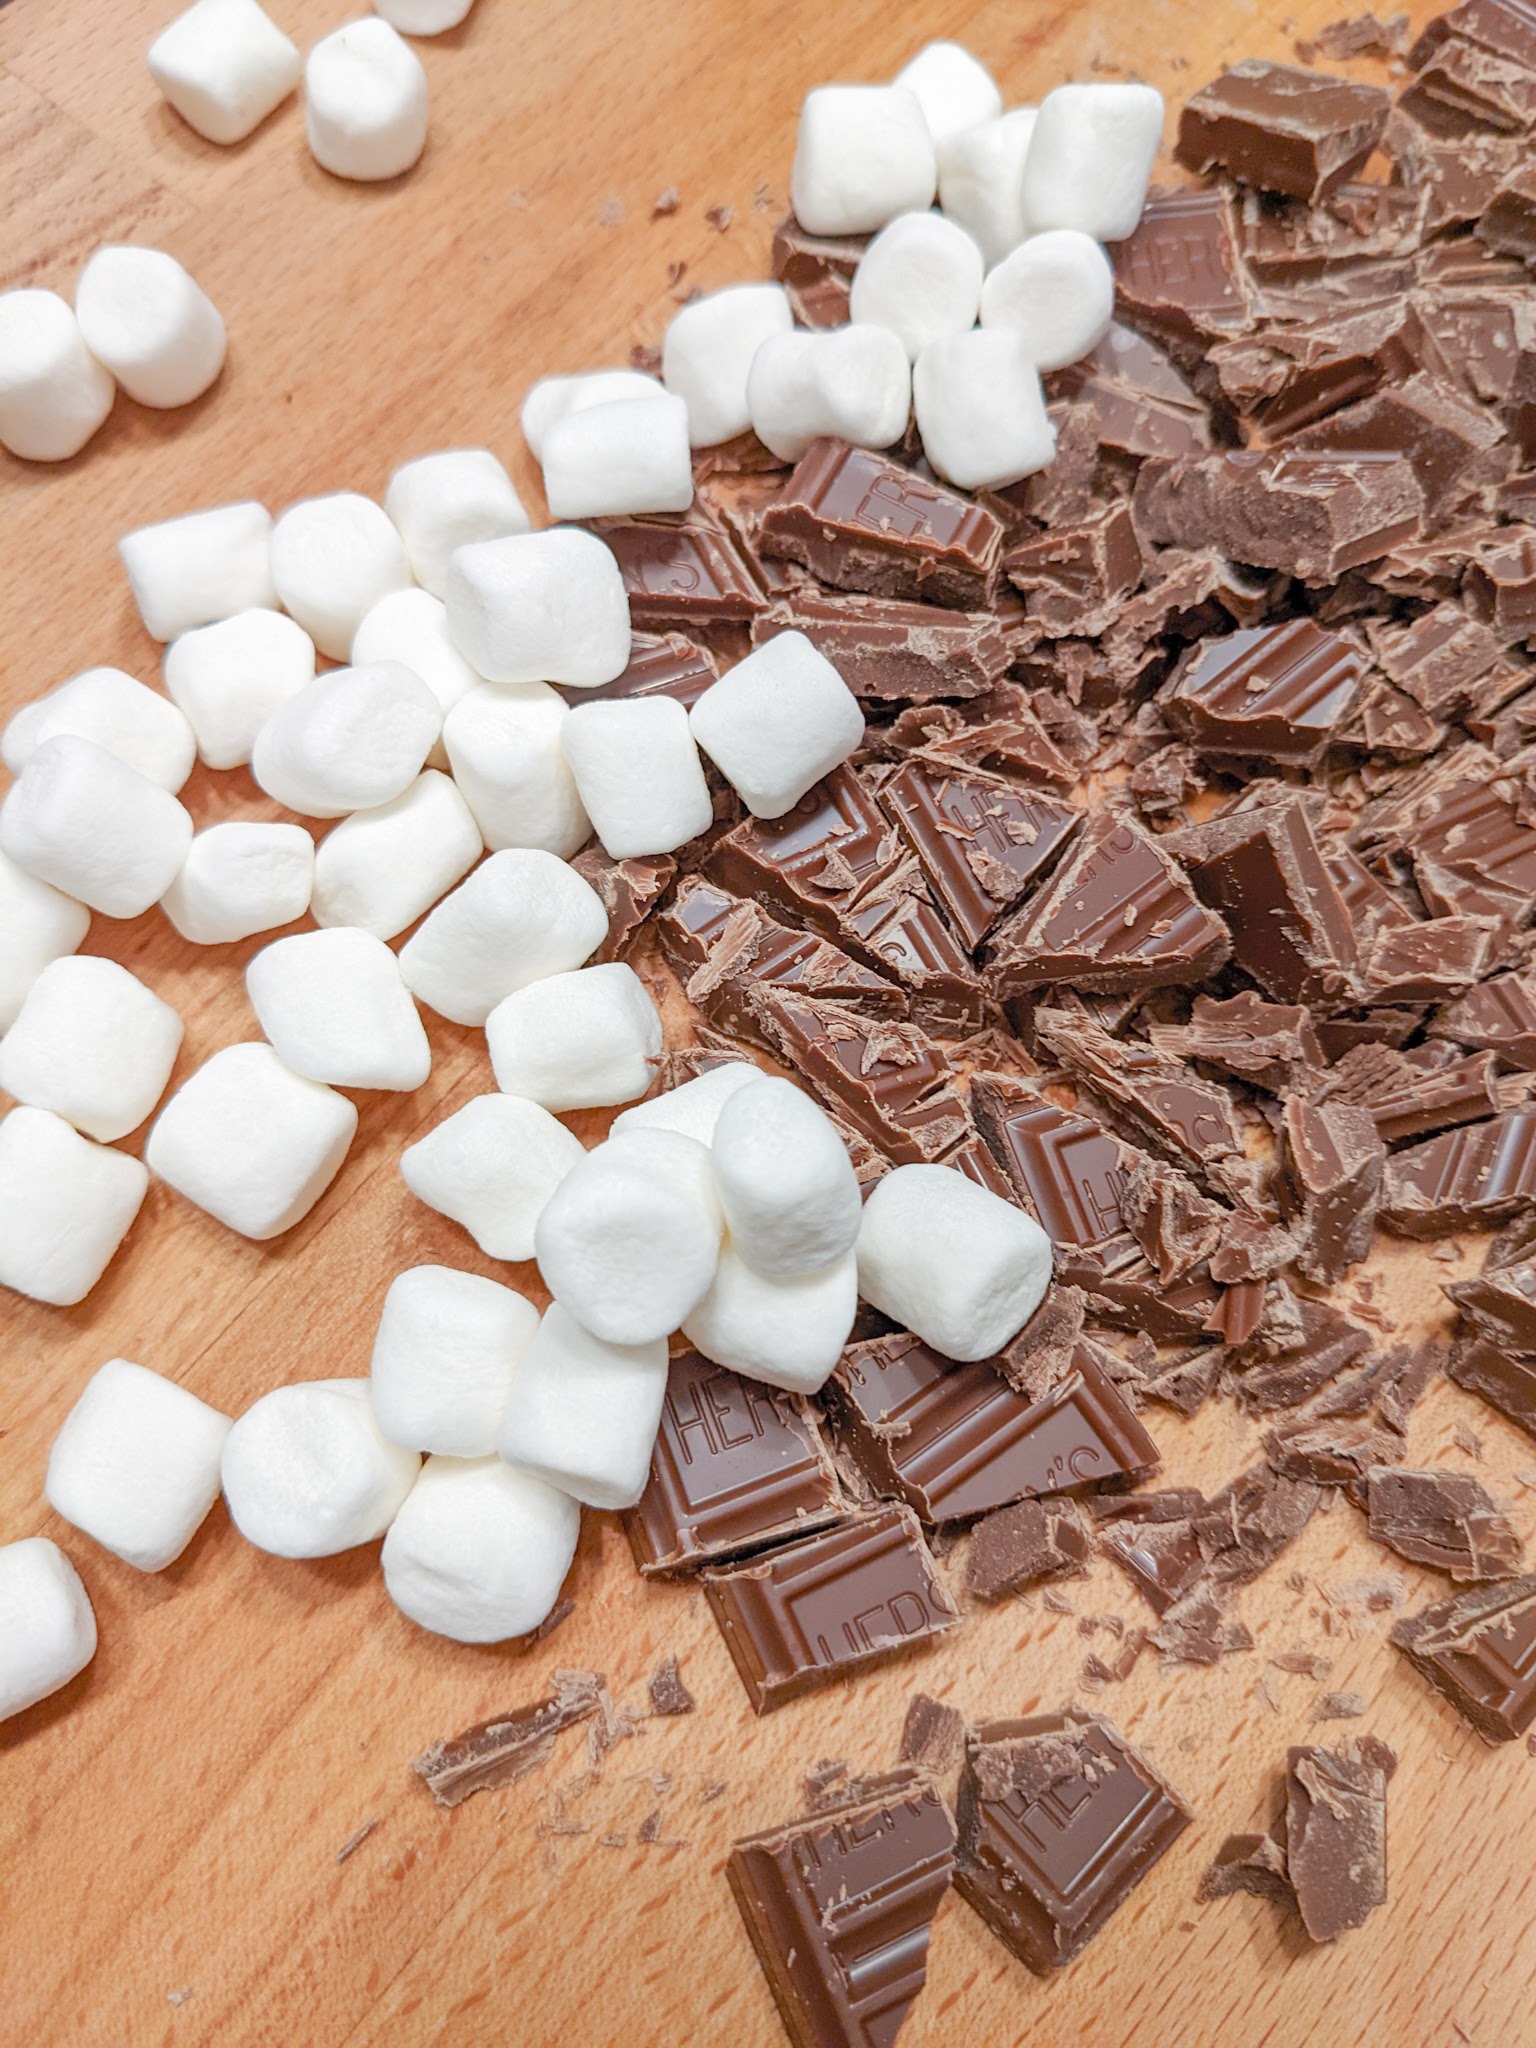
Let’s Bake:
These cookies are so quick and easy to put together. First and foremost, preheat your oven to 350F. I use my kitchen-aid stand mixer to combine all the ingredients. Combine the softened butter and brown sugar until light and fluffy. Add the eggs next. Make sure they are room temperature. To bring eggs to room temperature quickly, just place the eggs in a bowl of warm water. Next, add in the vanilla extract. Once the dough is smooth, add in the crushed graham crackers, baking soda, and salt. To crush the graham crackers, I just put a sleeve of graham crackers in a Ziploc bag and crush with my hands. Once combined, turn the mixer to low and slowly add in the flour.Chop up the 6 of your chocolate bars and mix these chocolate pieces and the dehydrated marshmallows into the cookie dough. Use a large cookie scoop and scoop dough onto parchment paper lined baking sheet. Put the cookies in the oven and bake for 6 min. After 6 minutes, take the baking sheet out of the oven and place 3-4 mini marshmallows on top of each cookie. Return the baking sheet to the oven for another 5 minutes or until the mini marshmallows on top become a nice golden brown color. While the cookies are baking, chop up the remaining chocolate bars. Make sure you don’t chop up the chocolate into too small of pieces, because this chocolate is going to be put on top of the cookies. Once the marshmallows on top are a nice golden color, take the cookies out of the oven and place some chopped chocolate pieces on top of each cookie. Let the cookies cool for a few minutes on the baking sheet, and then transfer cookies to a cooling rack.
Cookie Bars:
You can also make this recipe into cookie bars. This is my favorite way to make them when I am bringing them for a large group. Prepare the dough the same way that you would for the cookies. However, instead of scooping the dough into individual cookies, just press all the dough into a parchment lined jelly roll pan. Bake the cookie bars for 8 min initially. Then take the pan out of the oven, sprinkle mini marshmallows on top, and return the pan to the oven for 6 more minutes or until the marshmallows are golden brown in color. Sprinkle chocolate pieces on top of the bars and let bars cool completely before cutting. The cookie bar version takes much less time than making individual cookies and allows you to cut the bars into as many pieces as you need. I hope you enjoy!!!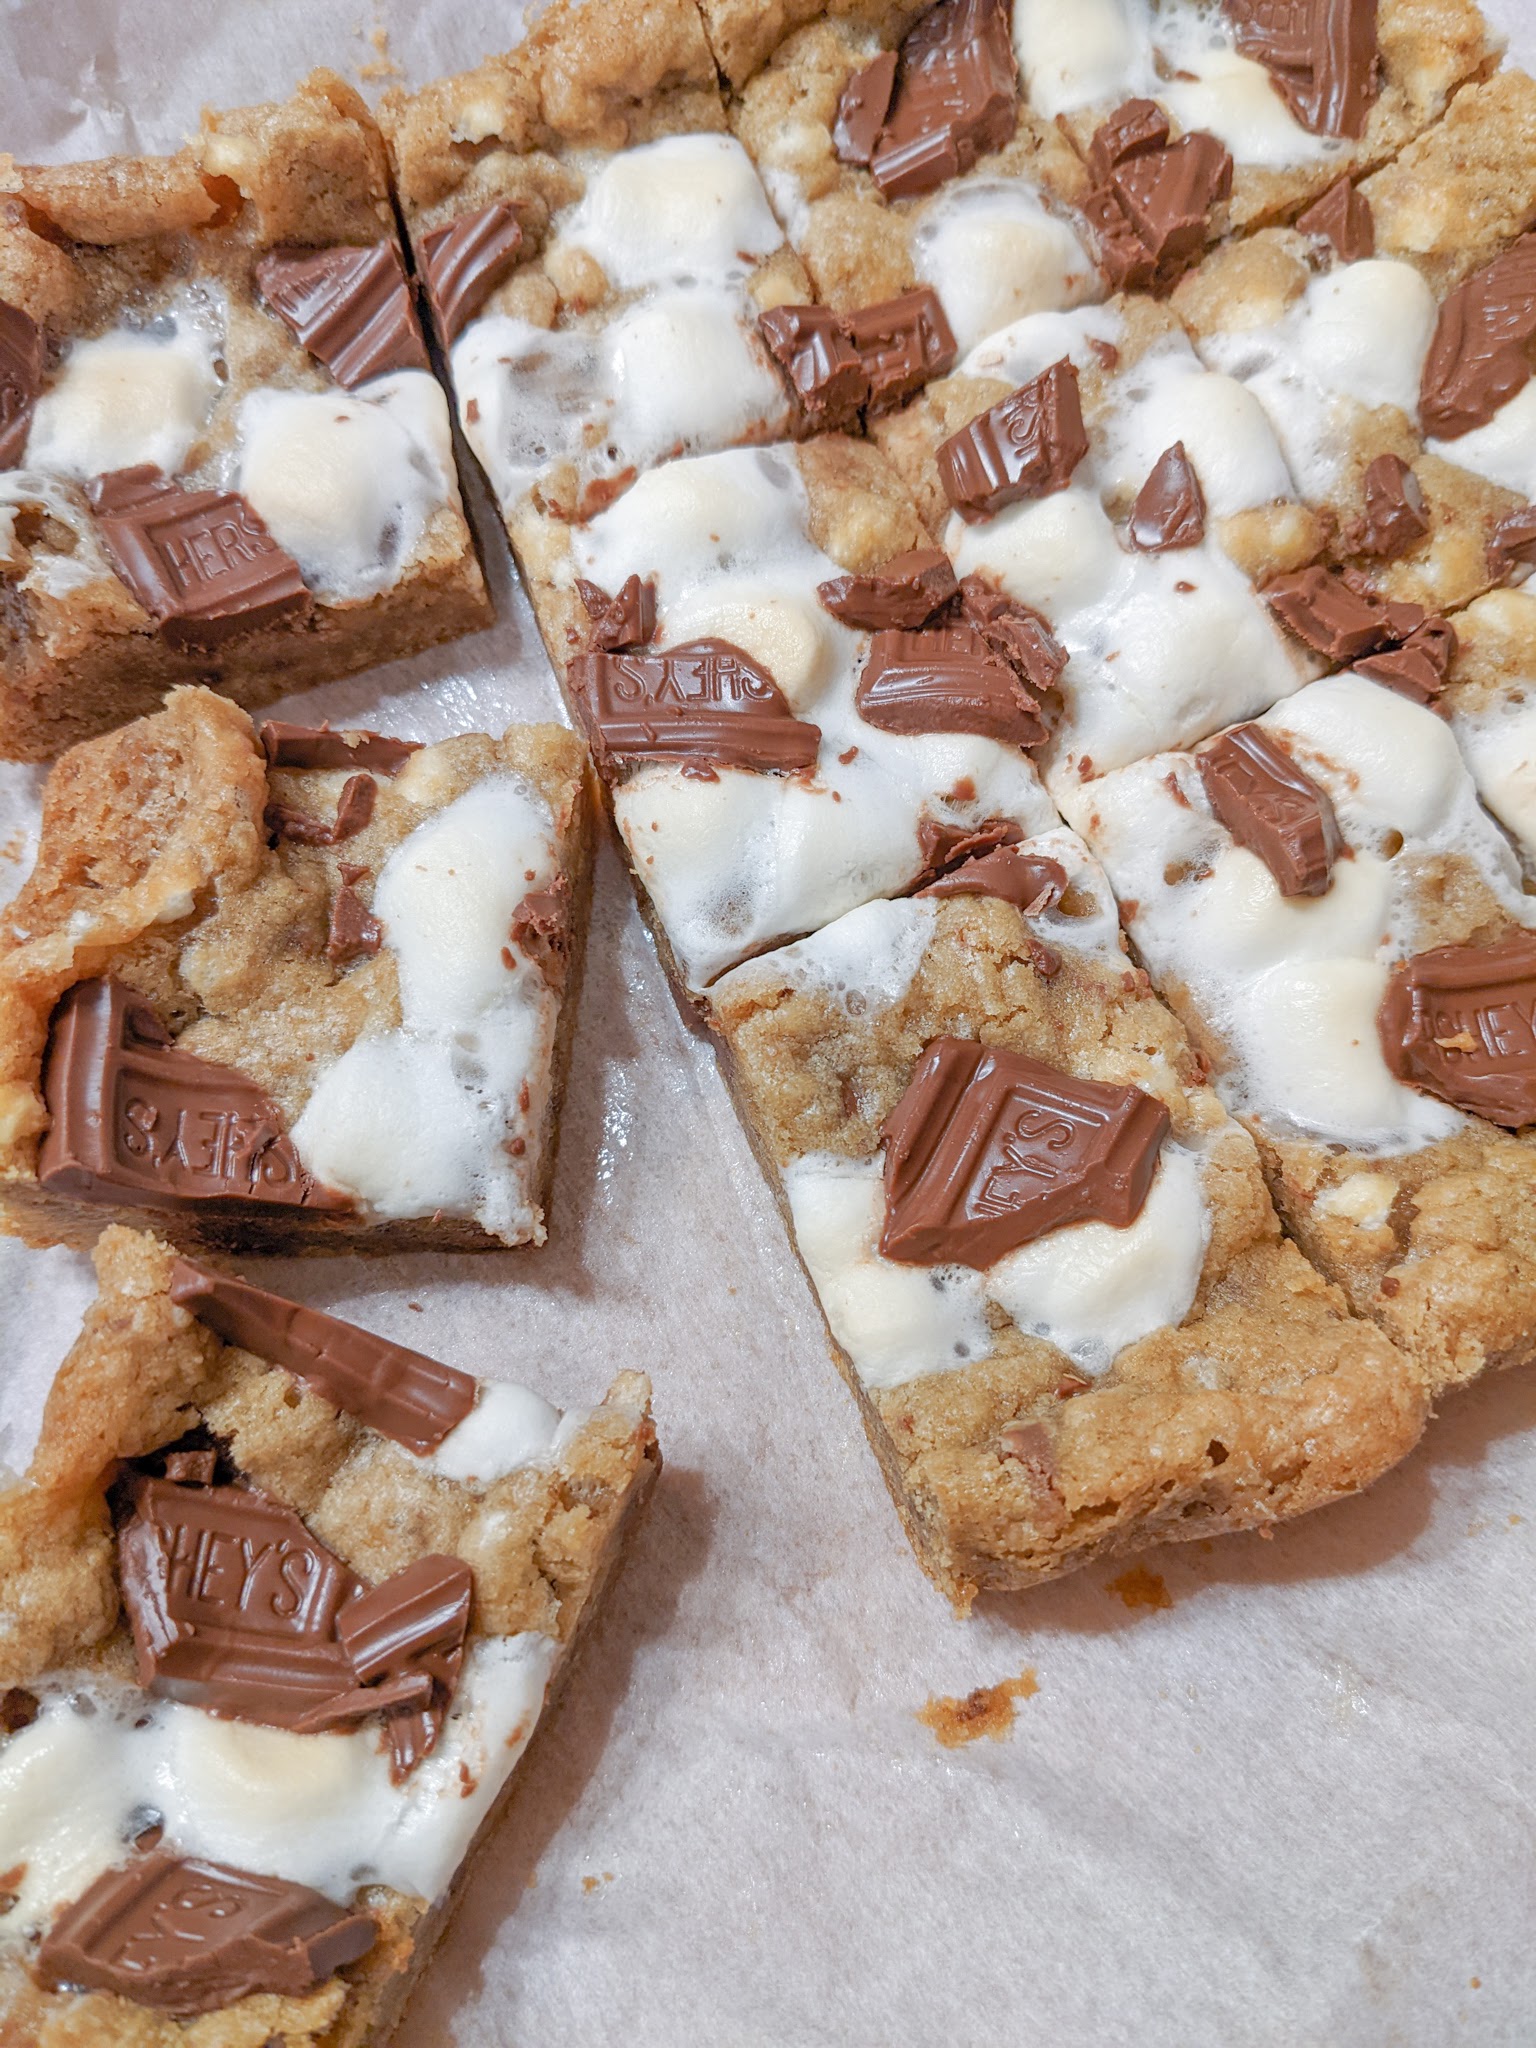
S'mores Cookies
S’mores Cookies
Ingredients:
1 cup butter, softened
1.5 cups light brown sugar
2 large eggs, room temperature
2 tsp vanilla extract
1.5 cups graham cracker crumbs
1 tsp baking soda
1 tsp kosher salt
2 ¼ cup all purpose flour
10 (1.55 oz) milk chocolate bars
1.5 cups dehydrated marshmallow bits
1 cup mini marshmallows
Directions:
- Preheat oven to 350℉. Prepare your baking sheet with a sheet of parchment paper.
- In the bowl of your stand mixer, fitted with the paddle attachment, mix together butter and sugar on medium speed for 2 min until light and fluffy. Turn the speed to slow and add in the eggs and vanilla. Mix until smooth, scraping down the sides of the bowl as needed.
- Add in the graham cracker crumbs, baking soda, and salt at a low/med speed. Mix until incorporated.
- Turn the mixer to low and add in the flour until combined.
- Chop up 6 of the milk chocolate bars. Add chopped chocolate bars and mini dehydrated marshmallow bits to the dough. Stir until combined.
- Using a large cookie scoop, scoop the dough onto the baking sheet. Try to keep the cookie dough 2” apart.
- Bake for 6 min. Remove cookie sheet from the oven, and add 3-4 mini marshmallows to the top of each cookie. Return the cookie sheet to the oven to continue baking. Bake for 5 min, until the marshmallows are golden brown on top.
- Chop the remaining chocolate bars into small pieces.
- When the cookies are done, remove the cookie sheet from the oven. Immediately press 2-3 chocolate pieces onto the top of each cookie.
- Allow the cookies to cool on the baking sheet for a few minutes, and then transfer to a wire rack to continue cooling.
Notes:
- You can easily make these cookies into bars. In my opinion, it is much easier and less work. Follow the directions through step 5. Instead of scooping into individual cookie dough balls, you can press cookie dough into a sheet pan lined with parchment paper. Bake for 8 min, then remove the sheet pan from the oven and sprinkle mini marshmallows on top. Return the sheet pan to the oven for 6 min. Remove the sheet pan and immediately press chocolate pieces into the bars. Leave the bars in the pan to cool, and wait until they have cooled before cutting the bars.
- The dehydrated minis marshmallow bits can be found at your local grocery store or on amazon.

About Me
My name is Kassey Bohrer. I am a mom of 3 wonderful children and recipe creator. I love to bake and share with others. Please enjoy these recipes, from my kitchen to yours.
Follow Me On
Contact Me
Send me an email if you have any questions or recipe suggestions. I would love to hear from you.
